Thank you for taking time to visit, and I hope I am even a tiny bit helpful as I have been helped and blessed by so many others. I have been doing Calligraphy since teens, and card making for many years as well. In 1990 I delighted in the joys of stamping with ink and embossing after a trip to Cairns, Qld. In 2009 I discovered the brayer, 2010 the Cuttlebug, also have now taking to reading up on crafting blogs and lo! Here I am, on one of my own.

I live on the coast of eastern Australia. I am a Christian. I trusted in the LORD down here at the beach, amazingly it is not far from where I now live. It was over 50 years ago, after a Beach Mission Service at the age of 12 years

Saturday 29 June 2013

Chris Dark, the Sketching Stamper + 80th birthday

 Hullo there everyone!! Years ago now I bought some digi images from Chris Dark, the Sketching Stamper - she does not seem to sell them now, which is a great shame ~ her blog is here. Here is one of the images ~ Bluebell digi I bought. 
She does have clear stamps of this image from "There You Go Stamps". I bought the set, and they are so VERY disappointingly small, so tend to use digi image anyway! Be good for atc's.
  I had this image printed for ages now, so made quick card up on white deckle card, single mount style:  Forever Friends Petal embossing folders, ribbon with pearls. Coloured with Tombow watercolour markers, mixture of PanPastels and ink on die cuts.
My rule for just trying things with PanPastels is still going just fine ~ have yet to find something with which you can't mix with them when colouring! :D 
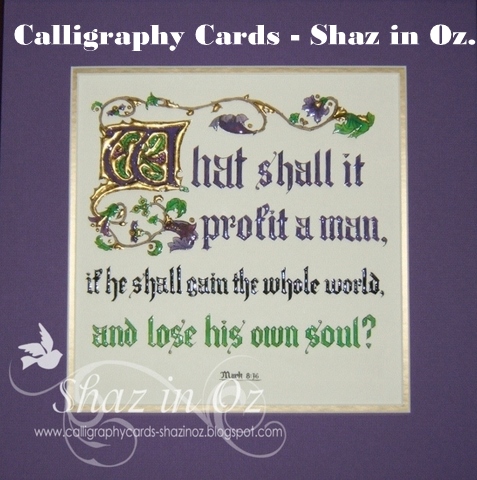
 Second card was an order for an 80th birthday, husband and wife, a day apart, so not too masculine, or to too feminine. Stamped disc. Bible verse stamp as requested and had this one done on vellum and card. 
I love this verse in Isaiah, a wonderful book in OT which am reading through now.
.."the LORD is my strength and my song; he also is become my salvation." 12:22
What a great birthday verse ~ to have the promise of God singing in our heart, to carry us through  when feeling down. His promise to those who are His, "I will never leave thee nor forsake thee".
Coloured the back of vellum, adhered to frame of Spellbinder labels 4, layered on scrap of DP Kaisercraft, cut with Spellbinders Nestabilities Cutting Dies Scalloped Labels 1. Embossing folder is in CB Oriental set - basket weave. CB Olivia die for 80, and EK Success Arrow Border Punch, with ribbon. SU punches for stamped greeting.
Thanks so much for popping over for peek and chat, may God bless your day wherever you may be.
Shaz in oz.x 
I would like to enter these in the following challenges:

Wednesday 26 June 2013

Make your Own Texture Paste + WOYWW!

{Warning - picture heavy post}
Hullo everyone.  
Another WOYWW! (What is On Your Workdesk Wednesday) over at Julia's Stamping Ground - there we learn lots, have fun, cheer one another up when need be .. so do join us, do! 
Today? another how to make..
Measure ingredients ~ see below recipe.
For as some of you know might know by now, I dont like wasting my craft pennies, if can make something with what I have already. So decided to research if you can make texture paste (after seeing it at Spotlight for $14.95).
 Here a You tube video I found (music with video is not my type, so muted it). Unable to add it directly~ so a click-able link: www.youtube.com/watch?v=EEDIUrI3o0E
I have put the video recipe below and some step by steps for you too.
Recipe:
Ingredients:  White paint, talc + liquid PVA type glue

Method: 1.Mix together equal parts of white paint + talc.
             2. Add half part of liquid glue. *(did 50g of paint + talc, glue = 25g)
             3. Stir! mix! stir! till mixed really well. I added a bit of water to mine as both glue and paint were thicker than You tube sample was, really stiff paste.
4. Tape down mask/ stencil, and spread on with chipboard spreader or plastic card as I used, onto stencils, etc., use craft mat for good removal of excess.
 You can colour it with paint, perhaps even re-inkers or food colour. Or even make it up with metallic paints in first place. The sky is the limit, especially if you have metallic paint, etc. (can buy here $2 at the Dollar store). It certainly seems* to dry well and flexibly (*only did for today's post so yet to test durability)
This lot cost me about $2 (instead of Spotlights $14.99) to make with things I already had. Used the talc to make half dozen more embossing buddies, or anti-static embossing pads (for recipe for that see here).
It really was unbelievably easy to make, which really surprised me. Mixing looked harder on video than was the way I did it.
Do clean up afterwards well! Oh, dont get it on your clothes, like someone I know did.. rescued in time, phew!
And for today's Aussie shot, the skies have had coast-hugging cumulus all week, amazing billowing spirals sometimes. In winter, such skies are quite common along this part of the coast, plus high tides like this one - king tides around shortest day on 21.6.13.
Thanks so much for popping over for peek and chat and may God bless your day wherever you may be,
Shaz in Oz.x
P.S. Picture of the week is over HERE on Chris' post ~ the second photo ..take a wonderful peek of new creations.  ..plus update on Chris' husband return home again.
P.P.S. For those in the know :D
Le Tour de France starts this weekend. My brother is over there again, as a Bikestyle Tour Guide, he is paid to go to France and surrounds for three weeks and more. They ride two thirds of the course in morning, and then rest and watch it from vantage point in afternoon during race itself. Here in Oz, it finishes at 2am, so I am up for late nights ... he has a blog again this year, it is on my sidebar or click here.
He was there as guide for whole Tour to see Cadel win in 2011, but went to to World Master's Cycling Track Championships last year in Manchester, instead of Le Tour. He is a World Champion in Masters Track Sprint think it was but only silver there in 2012. {And no! I cant ride a bike for quids!}
 
Here's an excerpt from his first post for 2013, sounds really tough??:
"This year the race kicks off with three stages in Corsica and I'll be fortunate enough to be there to see it all get under way. The group I'll be guiding will arrive in Nice this coming Monday 24th June and we'll settle in with some great riding on the Cote d'Azur, before heading over to Corsica ."

Tuesday 25 June 2013

Christmas Card Challenge with Cuttlebug Folders

Hullo there everyone!
...Well, wanted to do a challenge for Sarn's Rudolph day, or Christmas Challenge .. and also want to welcome some new Wonderful Encouragers on my blog. So special thank you to Monique vmb, (who has a Google + profile, so no details so Monique if you see this please let me know, so can encourage you by joining your blog, too ). Thank you VERY much also to Annie and Nan.G of WOYWW!
Well, my card is bit of a "cheater's" in way as used a topper, which I made with a "Pass-it-On" card mounted.
Saw them last year at Christmas time and thought they would make great card toppers, although not meant for that purpose - a pack of 25 was $1.25 .. howzat? 
This first one is for Hazelnut's Christmas challenge(and all for her June extra Challenge) - as this week's challenge is green with holly, etc. This was vellum, coloured on back with green dye ink, embossed with Cuttlebug Snowflake (Disc.) EF, then rubbed over with gold pigment ink for highlight. Corner holly is Martha Stewart pine leaf punch, with bling.


However this and the rest can go in Sarn's challenge have have basically just varied the folders which will give as go along.
 I have some of the card toppers left, and if you would like some, please put "YES, please" at end and will choose someone out out hat! they wont be gold mounted or have the bling on them, as I added that.
I have made ten cards with this in all, eight are shown as two are similar but they are all different. as they are made with lots of Snippets will hop over to Di's Snippets challenge too and also with the Word Art Wednesday Challenge - Anything Goes.
Many thanks every one of you for popping over for a peek and chat and may God bless your day wherever you may be!
Shaz in Oz.x
In order of EF folders of plain white are:
Mostly from CB Winter Wonderland set  except for  first white one (Marianne Frame Designables Folder 908), one with Gold pigment ink pad rubbed over is CB Holly and Ribbons EF.
Three cards have two of Sizzix borders EF  from Sizzix Embossing Folders - Christmas Set #6

Friday 21 June 2013

Annie's Friday Smile

Hullo there everyone!! Don't you love Fridays?? well they are even better since Annie started the Friday smile blog hop.. do pop over and join in the fun HERE!  
When I am able, I join in. Well, today I definitely had lots of reasons to join it!
Number one reason is my unexpectedly delightful happy mail the postie brought to my box today, Friday!!
 When lifted the lid what did I spy but a lovely Queen stamp showing UK postal mark...
Woo hoo! what fun! What do you know? dear kind-hearted Di bought all of Ryn's lovely red rubber bubbly stamps so there was a worldwide shortage when folk went to buy them, just so she give them as prizes to the playmates at the Playground.. isn't such she a sweetie? thanks Di! fancy posting it all the way downunder too, what a trooper!
 
Well, tomorrow is my youngest nephew's birthday and from youngest years he has loved Garfield. it is just so happens Garfield's birthday is a the same time of year each year so the jokes are age birthday jokes.


This was this week's paper, I made it up into a card for him. Inked the background snippet in two background stamps, both Hero Arts, one the linen stamp and the other the spot in Garfield like colours with a light dusting of gold pigment ink at the end. 
Heh-heh! sorry, that is soooo Michael { and so me, too}! it runs in the family :D

Well, thanks so very much everyone for popping over for a peek and chat. Thanks again, dear kind Di, you are a treasure of great value and beyond measure! and Annie, thanks for your fun blog hop, too.
May God richly bless your day wherever you may be,
 Shaz in Oz.x
I would like to enter this card in the following challenges:

Wednesday 19 June 2013

WOYWW, Pineapple update + Peter Rabbit


{Warning picture heavy post}

Hullo there everyone ~ in a hurry, as we've visitors arriving today, but are very welcome! I have a pineapple update, some craftiness + the happy mail continues - isn't it fun?? What wonderfully kind, caring folk there are at WOYWW - Julia's idea all those hundreds of weeks and posts ago certainly was wonderful idea for true lasting friendships. To my desk!
For those not in the know - WOYWW is What is on Your Workdesk Wednesday, check it out over with our Julia @ Stamping Ground
 
At back centre on my desk, near stamps waiting to be put away, is the wonderful bonus Chevron embossing folder, (with a sample done as well in silver and black Stazon ink) from the so very kind Maureen (aka Scrappymo) who sent it to moi, as a RAK - thank YOU Maureen!
 
  Thank YOU also for the lovely WOWW4 ATC's - *beautiful bird one from Elizabeth Silverscrapper, and card shown on left of desk (+ on top left), and *love the vellum embossing from Margaret /Glitter and Glue (front right on desk and pictured top right here), also was a card  back centre on desk.
In today's mail brought these from Ros C of Oz.  
Such beauties all of them, and they are little snapshots of the crafty interests and skills of their creators - they really are to be treasured! 

Here on the right is a Peter Rabbit baby card made for Hudson Peter some time back (full post below) or click here.
 Pineapple update:
 {it is of the Brommeliad family, for those who did not see the previous posts - link here.}
 It was grown from top cut from a bought sweet rough pineapple, and  not watered much, or treated with any TLC, took about eighteen months to shoot flower on lower left, (picture 1) and will now sucker new plants.  
Photo number 1. 6th Feb. 2013
Photo 2. One month later - 6th March, 2013
Photo 3. 27th April, it was nearly 30cm or 12 inches
4. Taken yesterday, 18.6.13. as you can see it starting to ripen, is well over  the length of the ruler on left  - so heavy it needs to be staked.It has sunny position, with some shade. 
This pineapple growing reminds me of how we need also to grow in things of God - to know Him, as He wants to know each of us personally, through the LORD Jesus - He loves and cares about each of us, and what we are going through now.
I thank God for the way He really is blessing this little plant! what joy!
To close here is the latest you tube of the rainbow lorikeets - I put it on "Annie's Friday Smile" post.
 
Thank you so very much popping over for a peek and a chat and may God bless your day wherever you may be! 
I will comment as time permits but thanks you so much those who take the time..you make my day!  :D
Shaz in Oz.x

Monday 17 June 2013

Baby card ~ Hudson/ Peter (Rabbit) comes to stay

Hullo there everyone!
Well this card was made a while back now but not blogged, and one of my family asked recently where it was, as it was known I had made one ~ so Nat this is for you! and of course, for Felicity and Nick, and little Hudson Peter!
Here 'tis! 
 Here you can see the details of the card - some time back at a sale at Spotlight store here in town, they were getting rid of some gorgeous Beatrix Potter items. Managed to buy some before they were all gone! (yay, thanks LORD!) this set came in half a dozen scrap book pages of 12 x12" for scrapping.
 I don't scrap and when going through my sheets came across the set, and thought:"Mm, I could fiddly cut out the corner feature from page of the Peter Rabbit, for my card feature..". It does have glitter on it but hard to see and so does DP. 
Here on left is close up and popped it on little mounts. On right is computer generated birth details for card and greeting, the cut in Octagons from Spellbinders. The background designer sheet is from same set. The pearl swirl was also another fab find, bought on sale ages ago in stash (was so excited when realised it matched! I do pray when making cards and does help :D). Lace is from Kaisercraft, with Martha Stewart Deep Edger Blossom Eyelet border punch, in co-ordinating papers.
Thank you so very much popping over for a peek and a chat (you make my day)  :D and may God bless your day wherever you may be,
Shaz in Oz.x
I would like to enter this card in the following challenges:
Papertake Weekly challenge- Hullo boys (and it a welcome to a new boy in town here)
Cute Cards Thursday -  Once upon a time ..(..there was little rabbit called Peter...)
V's Sweet Ideas - Baby cards (June Challenge)

Friday 14 June 2013

Fridays Smiles, Free Butterflies and the latest video

Hullo everyone joining up over with Annie's Friday smiles .. 
I thought you might like this..
 Pecking order at bath time with Rainbow Lorikeets, on my You tube video!! 
This is mum and dad (from last year's video) and the one that sits on side, and looks quite puzzled by their antics, is the juvenile. It is taken again through the lounge room window but this time from other side and the windows were cleaned recently too inside and out :D so sort of clearer. 

In the end my hands gave way so stopped it before end just as baby one started to have drink at the end, then flew away, sorry missed it .. (music is Handel's "Water Music", on video)

The bird bath is in the courtyard, on fence side, near the Mother-in-law's tongue which was in flower a while back (see here). Here it is a weed, I gave up pulling it out and decided was better than nothing. Photos often are taken of cards out in courtyard, on stone mat, or in courtyard garden which is shells stones and plants.. mostly collected over many years, shells and stones. Lots of walks... :D
Also saw a freebie today which made me smile, so if you like butterfly images you might like this too - see link here at FREE Vintage Digital Stamps. It was in different colour tones too. Would look fab printed on vellum, and fussy-cut out and mounted on card dont you think?
Thanks for popping over for peek and chat, and may the LORD bless your day with its burdens wherever you may be!! 
Shaz in Oz.x
PS would like to welcome my newbie encouragers on my blog, months since welcomed properly so here they are - thank YOU SOOO MUCH for encouraging me:
Silvia, Janet, Lucy, Shirley Anne, Gail, Ike, Karen M., Ria, Annette in Oz, Rosie, Angeliki, Betsy 
So many I thank you all however this is more than THREE whole months  - was actually ashamed when realised it is well over three months since welcomed any by name (shame on me!) links where I could find some.. not all share, so can reciprocate which  I always do, when able.

Wednesday 12 June 2013

Orange Black card, Inking Up Stamp Block + WOYWW 210

 Hullo there everyone! Another Wednesday already, and another WOYWW, or What is On your Workdesk Wednesday, over at Julia's Stamping Ground blog, do  jump over to peek at desks of the world.
Before go any further should welcome my wonderful new Encouragers who have joined this blog! it still amazes me that folk want to join :D thank you! you cheer my heart more than you know .. all of you!
 Showing you today a new method seen before, but forgotten, so when saw it again, and thought must try it.
Had to make an orange and black card for OSA, so decided to use the method by Beate Johns of Splitcoaststampers ~ inking up a stamp block. She did as one layer card but I didn't.
I happened to have this clear block on my desk, so was the one I grabbed and also used with ink pads on my desk, Spiced Marmalade + Vintage Photo (covered these brown edges up with sponged on black, when decided to use in OSA Swap). Spritzed water on this to spread ink as I forgot to breathe (huff) on the ink block before stamping, also inked it up twice.


Grain shaft UM stamp from Artneko stamps, with archival ink. 

 Cosmic Shimmer have the most fabulous colours but they are hopeless at getting blocked, Glimmer mists are better sprays in this regard I have found. This gorgeous gold one is one of them. May buy some small spray bottles and decant, but wondered if they might not do the same? I just used sponge to apply. However, as result of sponging, I had accident as you can see! thankfully was able to reattach without too much drama, when dry. I think only I will know - and those who read this post :D
 
Here is the finished card, and already sent off to the lady who was also in the Oriental Stamp Art (OSA) Swap. Embossing folder is Cuttlebug oriental set, Japanese scales.
Also just wanted to let you know have a post below this one (or here) on how to make your own embossing buddy or Anti-static pad for Stamping with Embossing Powder, for when you lose yours like I did! (see pickie on right)
Also there is a Calligraphy text posted back on the weekend, on the middle Verse in the Bible ~ see here! 

 Here is the requisite Aussie shot - of our local "5-min-walk-to" beach! a  windsurfer was riding the waves!

Thanks so much everyone of you who have popped over here for a peek and chat and may our wonderful God bless your day wherever you may be, Happy WOYWW!
Shaz in Oz.x
Stop press - today's mail brought two WOYWW4 atc's, one on left from Caro in UK and the other on the right from Bella is South Africa .. what a surprise! Thanks, dear kind friends, I love both of them! very clever methods on both!


Monday 10 June 2013

How to make an Embossing Buddy/ Anti Static Pad?

Hullo there everyone - well here is a post have been meaning to do for a while .. as it is great super easy tip if you need it!!
I do have a Stampin Up embossing buddy but it has for some months now "gone walk-about" (as we say in Oz). The last time I remember using it was with my calligraphy, but have looked through it several times (plus crafty stash) without success.
Now a friend of mine who is calligrapher actually made her's. We pounce the calligraphy work before using ink on good paper, especially vellum, so the pen glides across the paper better, and not gripping into it. 
So thought would make one and show you, in case you lose yours too! If you dont know what it is used for, it is an anti static pad and removes the static from cardstock/paper before stamping, so your embossing powder does not stick in the wrong spot. Once you get used to one you really appreciate it.
First of all chose a nice piece of well-used, clean cotton or non synthetic rag ...my friend used well washed well-worn flannelette but I did not have any of that, so used another form of rag, cotton undies (which you might have been able to guess :D). 
The important thing is it is to be **not to be too thin, 
to be **non synthetic due to static in synthetic fabric, 
and **well woven.
Decided to cut it out with largest of circles from Spellbinder, but my friend just did a rough shape.
Then add a good amount (about two tablespoons) of talcum powder - it can be baby talc, or similar ie fine talcum. Tie it up with piece of string.
Cut edges around to tidy it up, now it is ready to  pounce away on any piece of paper before stamping image and adding embossing powder. Make a number of them while you are at it, so you wont be lost for one again! ( Edit Feb 2019: I made six, and refill them when thin and no powder left).
Just for the record I have been using it for two months now, with complete success! still not found the missing one!

I will just close with a card made with Chris Dark image which was freebie digi and printed out ages ago, so using up my Snippets Miss! Coloured with pan pastels and tombow marker. This LOTV new home greeting was also in snippets drawer, so made up and new home card for Nat and Jay! I used my one and only roll of Washi tape on the new home card with two pearls. EF is Cuttlebug "Caramello". Entering this in Di's Snippet Challenge.
also the current LOTV challenge is use a sentiment - so joining that too!
Thanks everyone for popping over peek and chat, I do hope this has been a help! and may God bless your day wherever you may be.
Shaz in Oz.x
Related Posts Plugin for WordPress, Blogger...