Thank you for taking time to visit, and I hope I am even a tiny bit helpful as I have been helped and blessed by so many others. I have been doing Calligraphy since teens, and card making for many years as well. In 1990 I delighted in the joys of stamping with ink and embossing after a trip to Cairns, Qld. In 2009 I discovered the brayer, 2010 the Cuttlebug, also have now taking to reading up on crafting blogs and lo! Here I am, on one of my own.

I live on the coast of eastern Australia. I am a Christian. I trusted in the LORD down here at the beach, amazingly it is not far from where I now live. It was over 50 years ago, after a Beach Mission Service at the age of 12 years

Wednesday, 25 May 2011

WOYWW - What's On Your Workdesk? Wednesday 103

Well here we go flying through another week and rapidly heading toward to the two year anniversary of next week, so I had better get my skates on and finish that pIf, hadn’t I? .. here is some more work in transit on my desk. Today on left side, I am starting a small order for Morti of WOYWW fame, and a surprise her mother; so you can see its beginnings on the left hand side there, all pencilled in waiting for my ink Have finished the one I was working on last week and I  have posted it below. I’m working also on another large one which is an order for a wedding.

I will show it to you next week all being well it is inked in just waiting for colours to be laid down.
It did not take long to get to that stage as I had done it before and did not have to work from scratch, just copy it onto my sheet from the copy I already had here, which makes me very, very happy!!
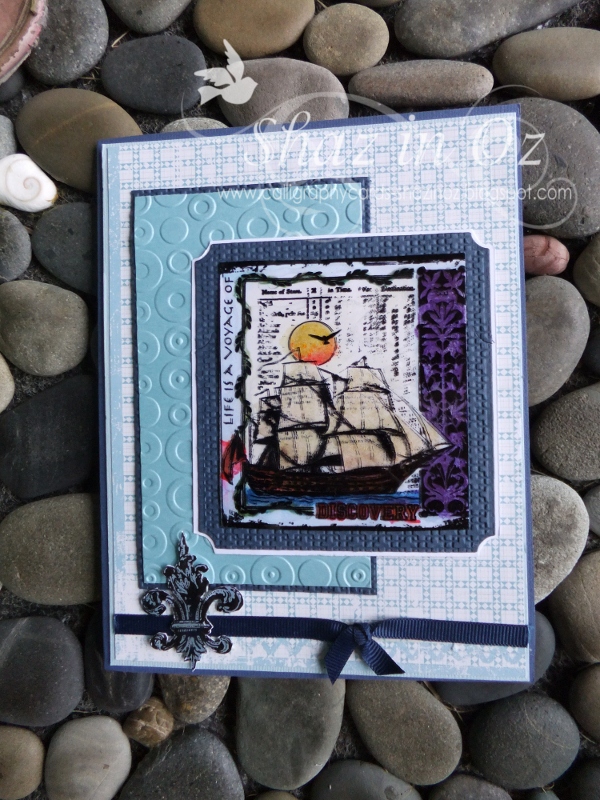
Now you can see my faithful bug on my desk which is still chugging along and also there are two cards in the process of being made for Fat Cats Card Corner. Both are Crafty Individuals Stamps - one is the lovely Robin or bird one.. I think it is a generic bird, but for this one I decided to make it Robins and stamped it on acetate. I used the Nellie Snellen Doily lace die also on this and the Epiphany Button Studio with the button there. Method explaining acetate stamping and gelly roll pens here, and also did the gorgeous sailing ship the same way. You can see some nautical print outs which are freebies from Far Hill (see side bar link to them) which I think I will use on assembling the Sailing ship card.
Thanks for looking and if you want to know why I am showing you my workdesk - do pop over to Julia's Stamping Ground and share in the fun of our blog hop around the world’s desks! You will learn lot! I have in my brief time sharing each week!
God bless your day,
Shaz in Oz. x


PS just want to apologise to anyone who wondered what happened to their comment, Blogger ate some last week and they are still missing so wasn't cos I deleted them. Poor old blogger has had a rough time lately!
PPS. this morning I finished off the cards so posting them here in their complete state. As we are ages ahead of UK and have a very busy afternoon, I will be late linking over today too. Elements in ship card as follow, DP Kasiercraft, Cuttlebug folder Spots and Dots, Large labels from Nesties extended. Also used an element from Far Hill Digi Freebies mounted on card, cut out and added Glossy Accents.
PPPS. the bubble thing on my desk that Sarpreet asks about is my clip on magnifier I need to use for my calligraphy - as eye sight aint what it used to be!
Wednesday, 18 May 2011

WOYWW - What's On Your Workdesk? Wednesday 102

Well, another big BLINK!! and here we are ready for another mid week blog hop on WOYWW, starting over at our hostess’ Julia’s blog for link up at to all the wonderfully inspiring desks around the world... Come and join in the fun at Julia's Stamping Ground!

   Not a great deal doing on my desk this week, I am working on a small text which is an order for a very dear friend. I really love this verse and would not mind one myself...my trouble is I do them for me, and end up giving them away!

 
This one is nearly on the homeward run, just finishing the last few layers of build up with glue size for the raised gold leaf. I actually did this one in my post before Christmas when I did seven at once see here.
 
I have made two cards which were started on last weeks desk and are an order for a very patient lady who is my very best customer when it comes to cards. You take back one order and she has another one waiting ready for you.

What a blessing she is too, thinking so much of others, a very giving soul in her 80’s.. I just love precious folks like that. 

This three panel card style with the Aspire stamp I first saw on Shaz Silverwolfs blog -You can see Shaz Silverwolf’s brilliant cards with this stamp here and here and here.
I did these ones with my brayer of course and the Penny Black Aspire card. I have found a really amazing paper to use with brayer work.. it is called Kromcote, and I bought in Oz at this link here  at Stamp It in WA. The lady over there was just amazingly helpful - totally recommend them. Now not sure where it is made, probably the USA, and it really is good. I always use glossy card and believe two things are important with brayer work:
1. light gentle touch 
2. right paper (and ink) - the paper can make or beak the end result, as can the pressure you put on the brayer. I have watched heaps of You Tube videos before starting to do it and as I  have said before this lady Sandy Hulsart is the best! This post on my blog has a some tips if you want more.

May God bless you day everyone and a very happy WOYWW!
Shaz in oz.x 


PS for those who thought I posted early it was Wednesday here - we are are just 15 hours ahead of you in UK.!  your 6am is our 3pm...You will see Wednesday on the post above :D not Tuesday.

Wednesday, 11 May 2011

WOYWW - What's On Your Workdesk? Wednesday 101

Well, happy WOYWW101 everyone! folks may be wondering no doubt – did I make the deadline with my text? And the answer is yes, praise God! Thanks to all who were praying for me.. The text was finished and picked up at lunchtime on the Friday before Mothers day on Sunday.


I was totally over it by the time I had finished, and the end was not with out its dramas. I had a big ink blot in totally the wrong spot to clean up and if it weren’t for answered prayer and my new “you-beaut!” eraser I would still be crying over spilt milk.


If you can get yourself one of these it will save a lot of angst when it comes to marks, even black ink you would think would never come out. It’s full title is a “ Pentel Clic Eraser Hyper Eraser “ and they are refillable, so that is really great. I bought it at my Sydney calligraphy store so you should be able to get them at any good art store.They are a cross between an ink and a pencil eraser - as white in colour but has a rough texture, and very fine so you can just erase a detailed small area.

 What I am doing now? as my dad says, I am running around like a blue tailed fly...trying to catch up the backlog. This week have five cards to make, three done and then other two yet to start. You can see the Aspire brayered work on my desk (and some Stampscapes - could not resist a play when i had my brayer out!!) and these are the start of two cards which I had on order.

The other three pictured are simple ones, all for my sister, one is baby card with Nellie Snellen Die, and then two others with Stamping Up papers as she likes simple designs. The clever ones of you will see a House Mouse one on my desk finished too as she also ordered one of these which I posted before a few weeks back now. It was sold so had to do another for her! Oops!

Also have started another small text which was ordered a while back - it is one I have done before so that is half the battle and have posted it before too. Have another large one on the agenda, a wedding present order  for July so really not time to sit and do nothing.

So if you want to enjoy a snoop at desks around the world please join in the fun and pop over to Julia’s blog, Julia's Stamping Ground! for the best blog hop around!


Wednesday, 4 May 2011

WOYWW - What's On Your Workdesk? Wednesday 100

Today is another WOYWW and number 100 … Mind you I have not been here for the 100 of them! I did not even know what a blog was when this all begun. Only discovered blogging just over 12 months ago... 
 Here is the latest update on the text of Ephesians 4 verse 32, still not finished but on the homeward run now. I work in mostly gouache (which I mix on the messy piece of card to the right of the screen - have used this piece for about ten years!). I also use some watercolours as you can see and to make sure I get the blending and colouring right I use a clip on magnifier glass (bottom right). I found this gem at Aldi and love it. I have done most of the colours and using the tabernacle colours here of blue purple crimson and gold.
These were the colours used in the OT when making the tabernacle and in the 1950's book ("Illuminated Texts and How To make Them" by C Willis & G Houghton) I used to learn my illuminated work they give the meaning as described. The top line blue is showing the work of the Spirit (Be ye kind) as the blues shows the Spirit, the  purple and Gold shows God’s deity and God the Father, and the crimson shows the blood and the Son of God so used the crimson for the last line and purple/gold for the middle line referring to God. I pray much about layout and colours. I have yet to put in the rest of the colours on the vine-work and apply the gold leaf. And yes! By God’s grace it will be finished in time for our mother’s day this Sunday (not my mother but a friend ordered it).

I have a new monkey Mrs A.! Here is my latest visitor from the UK - my family were over this week past (boo hoo! heading back today!) and they brought me a pressie of a "Deer" monkey (he has a reindeer jumper) as I have called him, here are the two of them!! And aren’t they just the cutest? they now ride around together in my car and they think it is nice to have playmates!


A quick card I did end of last week…I brayered Hydrangea Big Juicy pad with the lovely Leaves & Butterflies K Kingdom Embossing folder 129 from  Fat Cats Card Corner , put it through bug and the sprayed with Diamond dust Glimmer Mist, cut out oval and scallop oval in Magenta pink Mirri cardstock. Mounted on pale pink cardstock and adorned with Marianne Creatables Cutting Dies Butterflies in matching Mirri card and used Orchid craft Roses and pins for extras…oh and forgot! I used the Nellie Snellen border lace doiley die as well on the bottom!

Happy WOYWW everyone and do pop over to Julia’s blog, Julia's Stamping Ground! for the best blog hop around! 

Apologies now if I run late with my comments hop as must simply finish this text first but will get there if a little late!!

Wednesday, 27 April 2011

WOYWW - What's On Your Workdesk? Wednesday 99

Well, another big BLINK!! and here we are ready for another mid week blog hop on WOYWW, starting over at our hostess’ Julia’s blog for link up at to all the wonderfully inspiring desks around the world... Come and join in the fun at Julia's Stamping Ground!

As you can see my desk is littered with the Illuminated Bible text I am working on! For those of you struggling to read what it says, it is a very beautiful and meaningful verse from: 

Ephesians 4 vs 32
Be ye kind one to another,
tenderhearted, forgiving one another,
even as God for Christ's sake hath forgiven you.

Some progress has been made, thankfully design or layout is sorted.. but a long way to go! I can’t wait till have finished inking it in and then the fun part of laying colours down. This can also be very tedious but really life is full of that and you just press on. To make it more interesting this has a deadline of our Mother's day which is May 8th, and I have come down with a cough and cold!! Never a dull moment here! All more reason to pray; so all prayers for skill, strength and wisdom gratefully appreciated folks..

Here a few cards I have made this week as break from brain strain of text work, plus felt had to do another one for Fat Cats. I actually read Neil's post and thought of using this stamp ( for Neil's post link see here ). However I dont have his lovely Impressionist/Expressionist style, and so it took on its own shape. The Damask Duck is stamped on white card in black pigment ink, clear embossed then coloured with mixture of Caran D'Ache watercolour pencils and Pearlex watercolours for that shimmery sheen (you can see my Pearlex above right of desk with my piece of calligraphy - very small paintbox but colours that have real punch, I love them!). 
Stamp the same stamp on acetate with black Stazon, allow to dry overnight or heat dry if that sort of acetate.

I actually just used some scrounged acetate I found on boxes of cards and even the few scuff marks did not matter so use what you have don’t rush out and grab some expensive acetate!

Colour back of acetate with Gelly pens for extra depth ( or even Stickles as Neil did below on his post - see below link).
Then attach to original stamp ( I used Glossy Accents after reading this idea on Neil's glorious ideas filled blog see here -but you can also can use brads). Attached to black card which was highlighted linen look stamp from Hero Arts stamped with Versamark pad and embossing powder Iridescent. Cut with Spellbinder Square Scallop die.

Used Script Cuttlebug folder distressed with sanding block for extra dimension and designer papers for layout. I have done it various way just try it out..

 
Another layout was tried also..so play around and have some fun...
Meanwhile I must get back to work on my text and do a bit of blog hopping later when the rest of the world catches up with us over here! 6am UK is 3pm here! Have a Manchester, UK clock (where my family are - to know when to ring them!) on my desktop for all those who wonder how we figure it out..:D

May God bless you day everyone and a very happy WOYWW!
Shaz in oz.x

Wednesday, 20 April 2011

What's On Your Workdesk? Wednesday 98

 
Well here we are ready for another mid week blog hop, starting over at our hostess’ Julia’s blog for link up at to all the wonderfully inspiring desks around the world... Come and join in the fun at Julia's Stamping Ground!

Today my desk shows the beginnings of the long hard haul of designing an Illuminated Text layout (for those thinking it is book it is not.. some comments below say this - it like the one at the top of my blog; it is hanging illuminated work). It is rather a laborious and arduous task which involves a lot of head scratching, brow furrowing, praying for wisdom, and rubbing out as I change it yet again for the umpteenth time. Here I am working on the tracing paper which I use, as it messes up good paper big time to work straight on it.
 I always feel greatly relieved when this stage is over, and really is half the time of a fifty hour text.
I have done a few cards which were requests so will show you these also.
The first one was started on my post last week with the lovely Leaves & Butterflies K Kingdom Embossing folder 129 from Fat Cats Card Corner which I have extended using my extended method to double the length ( see here or sidebar labels if you don’t know how to do this). It has small embossed butterflies on it Marianne Creatables Cutting Dies Butterflies (just brilliant, these dies!) cut with the pre-coloured card; also the border with Martha Stewart Blossom Eyelet Deep Edger Border Punch. Butterflies were added where they were on the embossing folder, adorned with mini pearls.
If you check last weeks post you can see how I coloured the card with Glimmer Mists. Labels 4 Nestabilities were used for the greeting.
A button was made with turquoise coloured card with Epiphany Button Studio Round 14mm and attached to ribbon.
 I really was excited after making this card. My friend wanted a Kookaburra card for her beloved. I had no resources of Kookaburra images, so I “Googled” and found this terrific image. It fitted (sort of with a little help) a Nesties circle die and I cut it outside the Image (see excellent Tutorial at Tickled Pink Stamps on doing this
 I had cut an extra picture which used also to give a 3D effect by layering on top of the first image.
I used the Nestie Scallop and Branches Cuttlebug folder and some Stampin Up DP card for the layout. I love my Epiphany Button Studio Round 14mm, which was used on DP paper and attached to ribbon. 
My friend’s tears at seeing the card and reading the poem inside were a great joy and reward for the time taken. God is very good!
 
The last card was for a very dear lady’s 80th birthday which her Grandaughter asked me to make. I used my Brocade folder again and the Elusive Images stamp. I love the combo and used my new pencils Caran D’Ache watercolours and loved the effect on the watercolour paper - the colours were so vibrant!! Now off to peek at a few desks and must get back to the hard slog of doing my text layout!

Thanks so much for popping over and may God bless you over this Easter time, when we remember the  gift of the Son of God, Who came died for our sins and was raised again on that first Easter day, “Lo! He is not here! He is risen!”

Shaz in Oz.x

Wednesday, 13 April 2011

What's On Your Workdesk? Wednesday 97

Well, here we are fellow WOYWW-ers! back at another review of work-desks on a Wednesday and for those of you who are wondering what I am muttering about - join in the fun by checking out our royal hostess'  Queen Julia's glorious blog at Julia's Stamping Ground!

Here you will see my desk is littered again. There are some completed cards to the top right. To see these and also the terrific Fat Cats Competition [with three $100 AUD vouchers to be won! -wohoo!] see here .

Also I'm playing with some glimmer mist Jazz Blue and cosmic shimmer Silver having read Brenda's Blog - Floral Fantasies and her workshop on mixing them. I ordered these two new colours to have play and I am hooked!! Thanks B.! if you want to see it look here for her helpful tutorial . I like the Cosmic shimmer better for for its high shimmer but think the Glimmer mists lighter glimmer has place too according to what you need so mixing the two is good.

The embossing folder embossed above in white is one from Fat Cats (which I have extended using my extended method to double the length - see here or sidebar labels if you dont know how to do this). A new one called Leaves & Butterflies K Kingdom Embossing folder 129, which has small embossed butterflies on it. Since I was also sent the Creatables Butterflies from Marianne I am hope to make some butterflies with the spare card I have coloured as well. I have used silver Cosmic Shimmer and Jazz Blue in Glimmer Mist.

Happy WOYWW everyone and may God bless you wherever you are..
Shaz in Oz.x
Related Posts Plugin for WordPress, Blogger...