Thank you for taking time to visit, and I hope I am even a tiny bit helpful as I have been helped and blessed by so many others. I have been doing Calligraphy since teens, and card making for many years as well. In 1990 I delighted in the joys of stamping with ink and embossing after a trip to Cairns, Qld. In 2009 I discovered the brayer, 2010 the Cuttlebug, also have now taking to reading up on crafting blogs and lo! Here I am, on one of my own.

I live on the coast of eastern Australia. I am a Christian. I trusted in the LORD down here at the beach, amazingly it is not far from where I now live. It was over 50 years ago, after a Beach Mission Service at the age of 12 years

Tuesday, 28 August 2012

ATC's made for WOYWW folk - yes, about time I showed you!

Hullo there dear patient folk in blogland!
I am sorry have not been blogging much as I have been sick with tooth infection again; on double antibiotics for two days before it took affect and now on the tail end of second lot of them.
They are great, but it does make you feel peaky. I have to have it out by day surgery later in the year as it is an awkward extraction.

Finally here are my first ever ATC's (Artist trading cards, and measure 2.5" x 3.5" in case you did not know what they are, as I was puzzled as to what they were some time back! ).
 I have made them for folk in WOYWW - when we had the 3rd anniversary at the end of May, 2012.
I was away when it was all announced and made it home just when it was due. Some kind folk still offered to send me one and waited patiently till I made mine and sent them off to them..
I took a while to make these as I really struggled with them. 
I had never made an atc before and really found them hard... maybe I wanted to make them too complicated...anyway dont think I will ever fall in love with the format.
First one I made for Jo (Twiglet) in exchange for her gorgeous dumfling, and made with Stampin up stamp set (Oriental) on sponged background. 
The second was made for Neet, was using a piece of  multiple layers of EP and stamp work originally made and explained back here.

Third one was for Bridget from Oz, and I made it with a scrap piece of card I had inked up with left over ink and glimmer mists  - had sprayed onto a craft mat and rubbed the card in it to get the mottled effect then stamped with a Penny Black stamp.

This last one is for Bella in South Africa and made with Stampscapes..(see her's here). It is a scrap piece again but brayered and then stamped and mounted with two mini tags with Stampin Up punch and stamp set.
I think I like it best but maybe that is because I love Stampscapes so much... think you either like them or you dont!
Okay I have been not to beach much lately but here are a couple of photos taken with my **mobile phone camera two weeks ago when my brother was visiting. (**For those of you who may not know all my beach shots are taken on it as rarely have my camera.)
I love the crab eggs as we used to call these when we were kids on this beach - they are of course the neat balls from crab excavations of the holes - at low tide.. 
We used to try not to tread on them because we really thought they were crab eggs!! and then here are a couple of views on our walk..
A sandcastle and two windsurfers in distance waiting for the wind to come up - but it did not..and yes, we have had days like this for all of August, smashing "winter" weather, it will be about low twenties today.
 As this post is concerned with WOYWW  and some folk may not know what it is; it a weekly blog hop called What is On Your Workdesk Wednesday and most kindly hosted each week by the instigator of this world wide blog hop, our Julia of Julia's Stamping Ground!
 Not much happening on my desk, just some new LOTV cards, mostly for Christmas toppers as they had free post at the mo, even to Oz - always a draw card - check them out here! 
And still not unclogged the glimmer mists and cosmic shimmer but was told by Joanna Sheen they are meant to be laid down for starters so did that (top right)! I have not finished the Stampscapes card (left) begun on post below yet, but it is one step further along.

Thanks everyone for popping over for a peek and a chat and may our dear Lord bless your day wherever you may be!
Shaz in Oz.x

Wednesday, 15 August 2012

WOYWW Stampscapes + Clogged Glimmermist????

 Hullo there everyone - sorry things have been a bit quiet but you know how it is! I have been silent as had doctor's visit down in Sydney last week and rejoicing over improvement in results,  yay! thanks LORD! :D
Here on my desk today... mm bit messy.  Supervisors in attendance  - they actually do live here but move around a bit of course!! 
 You can see some sprays of glimmermist, Cosmic shimmer mist, etc. to the right. These have become clogged up because I did not read the fine print about washing them after use to prevent clogging!!
DER!!! now I am wondering what to use to unclog them...was thinking of cleaning spray head with methylated spirits - or should I start with warm soapy water??
A new addition to left of my desk! Another "hand me down" from my sister for my new room - how cool is that? things to be sorted but great storage and height wise next to my desk.

 Also on desk are some brayer snippets decided to make into cards - you see I tend to do a number at once when playing then make them up later. I was looking at the Stampscapes one when came up with this idea.
With this one I wanted to make a square, with a border edge around it. All my dies were a fraction too small and I was loathe to cut the picture down.
Then I thought, why not cut the die to pieces? {Addendum - some folks seems to think I cut the die up- I did not! I cut the die-cut of black card  to pieces :D not the actual die.}
 This the beauty of this die, Spellbinders Fleur de Lis square, it lends it self to this exactly - see ... none of the pattern is lost. This would make very good corners for a larger card or if you want smaller corners, just use one of the smaller dies.

Anyway Julia, head teacher of WOYWW (oh yes, WE ARE looking at desks folks, cos it IS: "What  Is On Your Workdesk Wednesday?") will be proud of my brevity. Do pop over to her fantastic blog and join us today!
Thanks so much for popping over for a peek an a chat. May God bless your day wherever you may be!
Shaz in Oz.x

Wednesday, 1 August 2012

WOYWW - a W.I.P everyone!

Hullo there everyone and as promised a few weeks back.. I had a craft room to organise - didn't I? You know this is my very first post of my craftroom!
{{ INSERT -a very loud "Woohoo" here!!!!}}
For those of you not in the know - WOYWW is a weekly blog hop - What is On Your Wordesk Wednesday? and here we do a reveal of what we are working on at present - or not! check desks all over the world, (click here) at our brilliant hostess', Julia's blog and see what you may learn and glean. 

Warning picture heavy post..
My room is shown in pictures below and it is still a WIP or Work In Progress.
Distant view of crafty space, the back of **bookcase in foreground to be a display board - has thick card over old spare material form previous curtains. (**Snaffled from lounge room)
This is my crafty desk with a Marianne die and  3D card in process of being made for friend's wedding at weekend. Wallpaper and carpet are from 1974 when house was built and purple was all the rage - another bedroom has burnt orange carpet :D and others have wanted to get rid of it - but I like it! Wait long enough and it is back in fashion...
My WOYWW corner and the supervisors of all crafty activities here. Monkeys being not so naughty at present as there is too much going on!!
Bookcase behind desk, with Cuttlebug etc., the embossing folders, Spellbinders and other dies and black/orange folder has unmounted stamps (see here) which don't come in packs; others are stored below.
Cupboard behind desk and bookcase, and has a cube shelf system.
Inside of cupboard top half, shows my stamp mounted on left (from 1990's when I sorted them this way), unmounted stamps in sets, other items in drawers. Snippets mentioned on previous post are in categories in lower right drawer system, with Ink dusters atop.
This was originally a spice rack my dad made and they no longer wanted it and he asked if would I like it - posted it back here, one of my first WOYWW posts.
Isn't he beautiful? Here is a new little visitor who has just flown in all the way from UK, he s having a rest here before flying off to my sisters just up the road! Jo, she was was over the moon with your stunning creation.
and dear kind Jo sent me two gorgeous poppy dumflings when I only ordered one - isn't she so kind??? One of these was also for my sister Di, who had been very kind for me.

 Please do pop over to the Crafty Sister's blogspot (see my sidebar) and check out these over there. I know Jo had four of these lovely dumflings for sale - and Jo, I will give the other one to my youngest sister....
Thank you Jo, they are VERY stunning. I so adore this felting work you do! It is amazing to think the owl was made out of a piece of Laura Ashley woolen sweater, I think Jo said, and then she felts it and creates!


Oh, I just went to the post - yes it is still morning here (Wed.) and look what the postman brought today.. all the way from South Africa - thank you, Bella! I do so adore TH elephant stamp! It has been on my wish list for a loooong time and I saw it done with shrink plastic like this on Neil's blog some time back and marvelled at it, thanks so much Bella ..
Happy WOYWW everyone and thanks for popping over for a peek and chat and may God bless your day wherever you may be!
Shaz in oz.x
PS any who want a seashore photo fix see post before this - here..

Oh, and you Brits, fab Olympics - am loving them and getting very eye heavy as it is wrong time of day for us - could stay up till 6am each day, that would work - then go to bed!!

Tuesday, 31 July 2012

Hi B. Poppies are Red ~ and here they are!

Well folks, around to doing this post at last!
I spied last week on B's blog (or Brenda of Floral Fantasies) was having a comp. for  a poppy card or one inspired by poppy colours. 
I bethought myself of this lovely digi stamp by Chris Dark, The Sketching Stamper (not sure if still available, bought it a few years back now).
It was in my Snippets pile... which, by the bye, have been separated into four drawers :D in my re-organisation. You will see tomorrow, all being well, at WOYWW that it is still a W.I.P. (work in progress).


First thought I would try new method - took Stampin' Up Chalks and used them with Ink duster for the background, dusted with Certainly Celery and the light blue. Rubbed out excess, then decided to use the watercolour pencils by Caran D'ache, as it is printed on printer, did not use them with water, but used blender pen at end from Promarkers. 
 Then made frame for stamped image with Spellbinders large labels (really love these they work for so many things) in Certainly Celery card and mounted it up and added black cut out at back. 
 Used Swiss Dots Cuttlebug folder enlarged and scoreboard for edged lines, with ribbon to match, and cut corner with Martha Stewart Corner Punch - Layered Arches. Another favourite of mine - highly recommend it as it such an open punch, it cuts beautifully. Found they are cheaper on eBay, for those of us Downunder.
Do pop over folks to Brenda's blog -  as it is very inspiring! she is one wonderful lady. I am thinking and praying for her at present, as Buddy her faithful companion is very, very ill, dear faithful fellow.

As this is a Snippet card, I also want to enter it in Pixies Snippets Challenge - yes bit late it not he playground but Di should know that is one of my attributes..don't like getting out of bed early. But check the playground every one, as it is open for two weeks this time especially for latecomers like me!

And to top it off going to also enter this in the Craft a Scene Challenge for this month as never seem to get around to it and this one fits into their "In the Garden" challenge for the month.. howzat?? must be record for me, three challenges in one!
Well, will leave you at the bottom of post with some photos over last month of the beach.. I am down there every week about three or four times.. but time gets away and dont post them much!
Had meant to add a greeting in centre but not sure at the time when made card... however here it is now ready for post - to friends for a a new home greeting card.
Thanks so much everyone for popping over every one for a peek and chat and may God bless your day wherever you may be!

Shaz in Oz.x
PS I also have taken a video of our garden clowns ( birds) eating the Grevillea nectar - but I dont know how to reduce it to add it to a post - it is only about 30 sec long, but too long for me to upload onto blog as it.. any help/ideas gladly accepted!
Big seas two weeks ago, these three on same day.


Same spot two days ago -  I thank God for His Creation, and being able to walk in it.

Wednesday, 25 July 2012

3D Daisy and Nellie Snellen ~ Cardmaking Online

Hullo there everyone. For those of you wondering where I have been?? still setting up craft room, and having a big sort out almost everywhere ~ See here!

The card today is using the Don and Daisy 3D sheet - this is prettier than the sheet colours show  on site, and it is a great, versatile set by Marianne Design with very good detail. 
Cut with fine scissors the pieces of Daisy from the top of the sheet, and shape them with the shaping tool on the dense foam Shaping mat.
Adhere them in order using the small 3D mounts and 3D glue until the layers are built up. TIP: when cutting them out place them in order to one side and shape and attach as you go. This is good when working with detailed 3D.
Once the picture is assembled, Daisy is carefully coated in Gloss Kote, Set aside to dry.
Then take a white sheet of card pre-cut to size (half an A5 sheet is almost the right size, I cut a little off bottom).
Using the Nellie Snellen Corner die cut carefully out each corner.
Make sure you line up each corner properly and for the top and bottom cut there was a slight overlap, at the centre part -shown below. There is no need to emboss it.
Using the Nellie Snellen Corner die cut carefully out each corner - make sure you line up each corner properly and for the top and bottom cut, there was a slight overlap. There is no need to emboss it.
I also found when using cardboard you needed to run it through about four times to make sure it cuts around all the lovely detail of this corner piece.
    Then when the four corners are cut, trim the excess to round off sides and bottom where they join the card, as shown in the two small close ups. Then attach with DST to a piece of pink card from the very delicious  Papermania A4 Paper Pack ~ Henbury Lane. 
    Then add the gold Peel Offs Happy Birthday with the pricking tool to place the birthday greeting carefully in top corners. Attach to white card base. Add the finishing touch of gold border peel offs.
      Thanks so very much for popping over for a peek and chat - and may our dear God bless your day wherever you may be,
      Shaz in Oz.x
      PS. This post was done at the weekend for my Wed post with Cardmaking Online DT blog, but since then there have been some changes and I am no longer on the DT. I've right cataract surgery coming up in 2 months, so it will be better not to have such responsibilities. 
      To those who have very generously supported my posts with them and joined the DT blog I want to say a very big thank you! You are ALL really appreciated more than ever - especially a very BIG thanks to especially to Mrs A. of It's an Alien Life, Sandra from Stamping for Pleasure, Sam from Hettiecraft, Jools, 
      Jani of Paper Compulsions and most of all to Anne of Brittany. I do love the blogging friendships we have, all over the world!
      However still wanted to share the card with you. 
      To all the WOYWW-ers, I hope to be with you next week, all being well, my room is making progress!

        Monday, 9 July 2012

        Tutorial: Peels Offs - Colouring + Using Transfer Sheet - Cardmaking Online DT

        Hi there everyone!
        This tutorial is with versatile peel offs for our newish blog, Cardmaking Online blog.
        Please have a peek and comment on post if you can spare the time - see here (big blog hugs if you are able :D), and sending those especially to Mrs A. of It's an Alien Life, Sandra from Stamping for Pleasure and Sam from Hettiecraft. All three kindly took the time last post or so. :D (Addendum - also big thanks to Jools who joined our blog too! :D).
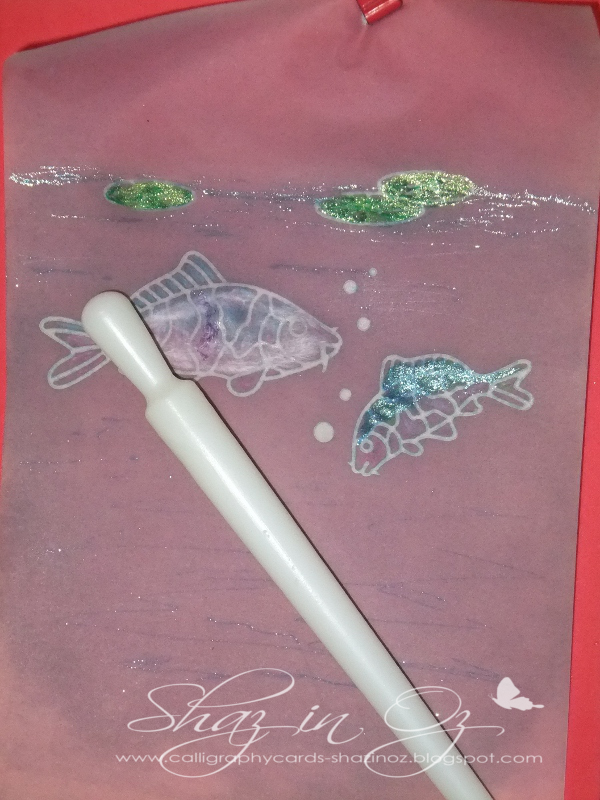
        It shows uses of both pieces of an image on sheet - ie the skeleton of fish in this case and the inside of image further down. Used is the Japanese Koi, but you could use any of these sailing ship sheets or these knights, cute teddies or pretty pansies, etc.
        Warning - this post is  picture heavy.
        Photo a.
        1. Take the sheet of silver fish peel-offs, Koi, use the fine pricking tool lift the outside skeleton of the Koi peel off and place on the plain sheet of vellum. Add the other pieces to make a small scene as shown in photo a. 
        Photo b. colour vellum background
        2. Colour the back portion of the the vellum to create a background on the vellum - inks used are shown in photo but use whatever you have, but it MUST not  be a wet type of ink. I brayered the ink on back of vellum, but you can use brush or sponge applicators. Allow to dry well before proceeding. (Colours will fade. Mounted final vellum on white card before making up.)
        c. Gelly Roll pens colour the fish and lily pads
        3. Colour vellum further on the back with Gelly roll pens (photos c. and d.).
        d. Shaping tool used to shape back of vellum.
        Use the shaping tool to gently shape the back of vellum fish to make them pop from the vellum a little (completed card below).
        4. To use the inside of the image, take a transfer sheet and peel the backing paper off portion you will need for size of the image.
         Lay it sticky side down over the image left on original peel off sheet. Use the sharper end of the shaping tool to make all pieces adhere to the transfer paper.
        e. .Image adhered to sticky side of transfer sheet, ready to apply to card.
        5.Then take the image and use shaping tool (rounder end) again to rub it onto the piece of card. Gently remove the transfer sheet.
        HINT: You may need fine tweezers to pick up very small pieces.
        Voilà! the image is transferred ready to be used.
        :
        Here are the two completed cards:


        Card ingredients listed below.

        Items used:
        Thanks so very much for popping over for a peek and chat - and may our dear God bless your day wherever you may be,
        Shaz in Oz.x

        Wednesday, 4 July 2012

        WOYWW and le Tour de France, of course!

        Hi there everyone well how are things with you? well I hope! I am enjoying our lovely winter sunshine over here!  And here is my workdesk or workplace - one of the major ones for the present:
        Okay you say, what is it with a big almost empty room?? table in front centre was culled from a house down road, moving and put it on their lawn. Bed that was in here has gone to a worthy recipient - been waiting for ages to find one, then for said person to come fetch it as we dont have a trailer.

         SO HERE IS the very beginning of craft room - all cleared to one side.... it will take shape over weeks as arthritic hands + time allow. Waited this long and can wait bit longer. Empty bookcase right was in the lounge room, and re-organised contents. To left are craft things in one corner. Two rooms are being re-organised at present, this and another bedroom. The other has computer, will set it up wirelessly and move it in, too. 

        Also here is our winter cactus too - zygocactus variety no idea which sort, simply one I have not managed to kill! But the flower is as bright and as cheerful as this picture shows - just love it.
        © A.S.O.
        “Grand Départ” of the 2012 Tour de France at  the Province of Liège, Belgium.
        Another big time eater for next three weeks is Le Tour - for those of you who dont know I am keen follower of Le Tour de France - see here and pickie of my brother on it here last year .
        It starts at 10pm here.
        Last night Stage 3 was incredibly exciting, with loads of horrid crashes and other dramas at the end, so you really were kept guessing as to how it would end. It finished about 1.30am or so.
        Thus I am rather out of whack and time poor in first half of day. I wont make it around to many blogs, so many apologies because of all that is going on any blogging is going to be minimal (except for DT post).

        No more time here, must fly - but do rush over to the best exploring and learning blog hop around at Julia's  - the Queen of WOYWW for What Is On Your Workdesk Wednesday!
        Oh and before I go, a special welcome to my latest Wonderful Encourager - Amanda of WOYWW - thanks so much Amanda and do pop over to her wonderful blog too! :D

        Happy WOYWW everyone and thanks so very very much for popping over for a peek and a chat. May God bless your day wherever you may be!
        Shaz in Oz.x
        Related Posts Plugin for WordPress, Blogger...