Thank you for taking time to visit, and I hope I am even a tiny bit helpful as I have been helped and blessed by so many others. I have been doing Calligraphy since teens, and card making for many years as well. In 1990 I delighted in the joys of stamping with ink and embossing after a trip to Cairns, Qld. In 2009 I discovered the brayer, 2010 the Cuttlebug, also have now taking to reading up on crafting blogs and lo! Here I am, on one of my own.

I live on the coast of eastern Australia. I am a Christian. I trusted in the LORD down here at the beach, amazingly it is not far from where I now live. It was over 50 years ago, after a Beach Mission Service at the age of 12 years

Showing posts with label Tim Holtz. Show all posts

Monday, 5 June 2017

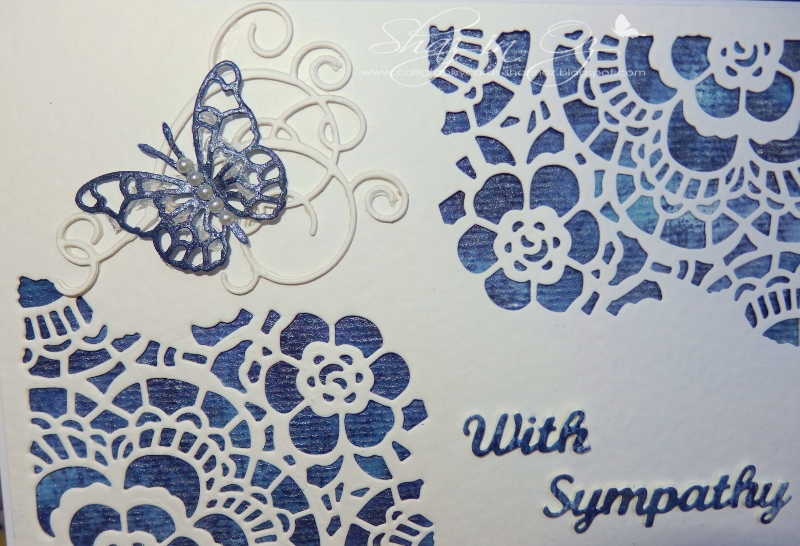
Tim Holtz Mixed Media #2 Die - Bizzy Bec's DT Anything Goes Challenge + Butterfly Challenge

Well, time again for ANYTHING GOES June Challenge over HERE at Bizzy Bec's!
...please do pop in! As you might win that monthly prize, which Bec so kindly gives!!!
My card is layered, but in a CAS design really.
Items used:
Tim Holtz Mixed Media #2 Die set
Elizabeth Craft Design "With Sympathy" die
Memory Box Pippi butterfly 
Memory Box - Elegant Scrollwork
Tim Holtz Chipped Sapphire Ink Pad 
Tim Holtz Faded Jeans Distress Ink Pad 
Shimmer Mist
White Hammer cardstock... that's the WHAT? Now for the HOW!
First I took a piece of hammer card to size ( 5 x7" card topper) and die-cut and embossed two lace relief from the Lacey Die in the TH Mixed Media#2. Then cut a piece of watercolour paper (chose from one pad which is textured on one side).
Taking DI Faded Jean + Chipped Sapphire, smoothed colour randomly from ink pad in two open corners.
Then spritzed generously with Imagine Crafts Shimmer Spritz Frost. Heat set the colours then topped it with little more of deeper shade. Once dry attached top layer with foam mounting tape to pop it up a bit.
Did same on a small piece cardstock for butterfly and word die as well.


TIP for Word Die layering - if you leave the base die cut attached to bottom outline, then add next two pieces using outline as guide. Find this stops them stretching out of shape + these Elizabeth Craft Design dies tend not to do that.

Triple layer MB Scroll die too.
Add layered die cuts on card base, using Ranger Multi Matte Medium.
Love the monotone of this card, plus very happy with my only set of TH dies, think they're very versatile.
You can see shimmery sheen in image close up below .. hope you like this too!
Aussie shot was taken last month when we went for a long drive, to Red Rock, now wonder it is called that? sadly not great deal of the namesake Red Rock left, due to beach erosion.

 Now dont forget to pop over  HERE at Bizzy Bec's and check out the other DT gorgeous creations, and please do join in the ANYTHING GOES CHALLENGE - to win that prize.
Pop by Bec's store, too, for her great bargain prices
.
 

Special prayers at this time for all who suffered in London Sat evening and others from previous attacks across this troubled, sin torn world - truly we need to look to the Lord.
Hence why I chose the verse below..


May God bless your day wherever you may be .. and please say hi, so I know you've been by!
Shaz in Oz.x 


For the LORD Jesus, the Prince of Peace said: "Peace I leave with you, My peace I give unto you: not as the world giveth, give I unto you. Let not your heart be troubled, neither let it be afraid."
 John 14:27
 
Linking up to:
1. Butterfly challenge - L is for Layers and/ or C is for Cream
Just did "L is for layers" with many layers, no cream. Layered dies by three on Swirl and With Sympathy. Under lace Die layered a coloured sheet of watercolour with two sections coloured in Distress inks as listed and spritzed with Shimmer Mist Frost. Glued the two top layers onto white base card.
2. Word Art Wednesday - anything goes http://wordartwednesday.blogspot.com.au/ 
3. Anything goes - http://lilpatchofcraftyfriends.blogspot.com.au/2017/06/challenge-59-winners-from-challenge-58.html

Wednesday, 10 April 2013

Polished Stone Technique with a Twist/ Alcohol, Inks, Photo paper + WOYWW!

{Warning - picture busy post} 

I found this idea on OSA (Oriental Stamp Art) for using inks, so thought I would have play.
Below is the original method - I changed it, using the ideas by Annette and mixed it with the plastic wrap post (back here for full step by step method, sent kindly by from Maggie Silvercrafter).
From Annette of Artneko (A.A.A) stamps:
*You will need:*
 Kodak 4" x 6" glossy cardstock or some glossy cardstock, cut the sheet into quarters.
isopropyl alcohol (ie Rubbing alcohol in Oz, could buy alcohol swabs, or your first aid kit, etc.)
cotton balls (cotton wool)
3 alcohol inks in the same family (shades of blue and purple...pinks, reds,and yellow...any colours will do)
Gold leaf or other metallic marker (optional)
Bull nose clip or punch clothespin (optional)
Latex gloves to avoid staining your hands for a week (optional)
Newspaper or protective covering for your work surface
Glimmer mist if you want sparkle to your finished background
*Directions:
Wipe an alcohol dampened cotton ball across the surface of the glossy paper.
Add 1-2 drops each of 3 alcohol inks.
Dab the cotton ball to fill in areas with color. Leave some areas white if
you wish.
You can also swipe the cotton ball across the glossy cardstock if you
prefer.
Add a drop or two of metallic marker to the cotton ball and dab areas.
Create several.
Spray with glimmer mist. (optional)
Allow the cardstock to dry; use bull nose clip or peg if desired.
Stamp as desired.
Did not have all the ingredients suggested by Annette so thought would use what I had, and see what happened.Here, in above photo, you see a sheet of photo paper wiped over with a cotton ball and Adirondack blending solution. I do have other alcohol inks but could only find the metal ones and a few re-inkers in dye ink.
Here I am using the DI Rusty Hinge and  Green shutters, with either gold or brass (?) in alcohol inks. 
Used the same plastic wrap {from this post here} as used on earlier piece to spread the ink around without getting inky fingers (which was Pink DI and Blue from SU, with silver), so some silver came on it. The small shot at the top was when it was wet. 
I had to put it in our drying cabinet to dry as it is too humid here even at this time of year, for this sort of paper to dry out otherwise.
On right is card finished as my father's birthday card.
 As with a lot of things I could not bare to cover up the gorgeous colour so left most of it showing.
Embossed the piece of photo paper with Tim Holtz folder, hence the distress look with it. Then mounted on and enlarged scalloped square black card.
Stamped in permanent ink un-named Tiger stamp (from USA, c.1990's bought in Brisbane or Sydney) on cork. It also was bought about 15 years ago, die cut with large labels, stamped "About Art Accents" signature chop to make it Oriental, with Oriental "AAA" happy birthday. Cut in black one of Spellbinder labels, and mounted cork happy birthday with black ribbon. Mounted on hand made paper [kind of cork looking] from the local beach-side markets.

From end of sheet, stamped Artneko Tiger, Oriental stamp + Script embossing folder.


Closing with floral bouquet from Oz , growing on the side fence is a less common variety called Jamaican Sunset of the Allamanda vine - this one creeping over from my neighbour's.
-
The fragrant frangipani are finishing now autumn is here in Oz.
For all WOYWW-ers please pop over to Julia's blog hop here to see all these great inspiring desks. I am sorry in advance as commenting is limited too for next few weeks or so.
Presently flat out with jobs, getting ready for other cataract surgery on 22.4.13.
I would just like to close with a special thoughts and prayer for a dear WOYWW-er who lost her wonderful husband suddenly on Sunday. Sending you many thoughts and prayer dear Maggie Silvercrafter. She is a follower of many of your blogs; her name is one I see many times over when joining them. Her heart is a very kind heart - God bless you especially at this time, my dear Maggie.
 Thanks so much everyone for popping over for a peek and chat, and may God bless your day wherever you may be,
Shaz in Oz.x

Tuesday, 17 January 2012

Less is More + Craft A Scene Challenge + PanPastel Challenge


 Hullo there everyone! Well, today I had to make some cards so decided to hit a few challenges with the cards.
First of it was Less is More that set me off – you see this week was to be a One layer card – with little or no embellishments with white areas is the criteria – and Title for this week - "Birds".
Here I decided to get inky! Out came the brayer, inks,Stampin Up black pen and few other tools. I Cuttlebugged a double mask (so no bleeding with just one layer) in Labels Four.
 I then used Tim Holtz inks (Mustard Seed, Peeled Paint) with the yellow/green end of Kaleidocolor “Calypso” plus Tim's Tattered Sparrow stamp in Archival black.

I did my brayer marbling method I developed and posted last year in full – here you can see it step by step. It looks dreadful to start with but love the effect myself. 
The idea came by looking at the lid of Tim’s inks (namely “Peeled Paint” online as did not have any then) and thought:
“Mm wonder how I could do that?”
I did not have any of his inks then only Stampin Up spots! The desk is shown set up with the mask to show anyone who is not familiar with this method.
 
Now either the very plain white card can be used for the Less is More challenge, or the one with two brads. I was not sure if two brads were ok?

If not then I will enter the totally plain one but I really like the two brads on the second card.

I also made third one with a black frame – just for a difference! I am going to enter this in the PanPastel Challenge – “Anything Goes”!
They are having their very first challenge and you don’t have to use Pan Pastels to enter. But – hey, the prize is some of them so then you could end up with some, couldn’t you?
I love Eileen’s entry, she is on the DT and I have followed her for years. 
She was my very first Wonderful Encourager. Her entry is so clever – deceptively simple and effective!
And lastly but not least, I will also enter this last card also in the Craft a Scene First Ever Challenge for my second entry (first entry here). Here also “Anything goes” as long as it is a scene – this is their very first challenge too so do join them also if you can! At least have a look and be inspired by the brilliant entries so far.
So thanks for popping over everyone for a peek and chat. And may God bless your day wherever you may be,
Shaz in Oz. x
PS a big welcome to my new Wonderful Encouragers too! You and also those long-time ones are appreciated so much! take a peek at these bloggers and new wonderful encouragers -  Anne, Olga, Brenda, and Gay .

Wednesday, 3 August 2011

WOYWW What's On Your Workdesk? Wednesday 113

Well, my desk is in its usual mess for this week's blog hop-- for those of you who like to learn and have fun at the same time, do pop over to our dear hostesses'  blog and desk, Julia at Stamping Ground!

The first card shows two of the new goodies from Fat Cats Card Corner – Spellbinder Lattice Rectangles and Nellie Snellen Square Stitch Multiframe dies – wow! I love Nellie Snellen dies; just wish they had one size bigger, as they only seem to go to small sizes for small cards. I loved the combo with the lattice dies too. Also used on the card is the Unity Stamp called Itty Bitties - Beauty.

 On my desk you can see my bakers twine from Jo - and dear, kind Jo also sent a lovely little bookmark tag. My first lot of baker's twine, I have not seen it here so will be fun to play. The UK Craft Stamper mag. is from equally kind Lisa. What a buzz it was to have it posted all the way over here! Smiled all day! Thanks Lisa - when I saw the words "Bless You" (top right) on the front cover I felt like yelling it from the rooftop! I sent up a prayer of blessing instead and for other givers from WOYWW, too. Even a welcome comment below is free to give and a blessing too! :D
See how generous WOYWW friends are? There were stamps from Ros in Oz last week... howzat? There are two cards below made with the stamp on the front of Lisa's magasine.
As promised last week I would show the cards I had started on last week's blog.

My second card is one of my favourite mediums: the brayer and Stampscapes stamps. I have done this card before, you can find the recipe on this post here. I also used a new folder - the Tim Holtz Dot matrix embossing folder and have used it debossed here, I am really going to love this folder! Used Nesties, labels 4 in black and small oval in blue for computer generated greeting.

My friend loves mauve - or purple! so for her birthday card a brayer card is made on glossy cardstock (Kromecote is best), using the lovely Spellbinder Lattice Rectangles. 

I love this die set. I think they are very versatile and used the brayer and some discontinued Elusive Images Meadow stamp set bought on eBay.Then I made two more cards using the brayer stamped insert - the Doodle stamp from Lisa's Craft Stamper.

 When she generously offered to send me one (after I made a comment on Elizabeth's blog), I thought at first she was sending one of her old ones. Then she told me it was a current one. This card has the daisy Cuttlebug folder - distressed on white core card, and the Martha Stewart Doily Lace Punch (courtesy of Trish of My Daily Dose Blogspot who kindly came and did some punching here one day with me - what fun!).
The next card has the same centre - using the Riveria Kaleidocolor Ink Pad.

Also used the Nellie Snellen Square Stitch Multiframe dies, the Marianne Small Butterfly die,  and  K Kingdom Leaves and Butterflies Embossing Folder.

 Happy WOYWW everyone and may God bless your day wherever you may be!

Shaz in Oz.x

 PS. Does anyone know if you can buy a tan mat bigger than 5 x 7? This is the size of mine and all the ones which I have seen for sale. If so, what size is it please? Thanks everyone. 

PPS. thanks for all your tips have really helped and found one thanks - but not sure may try some other rubber mats just in case! For those who dont know what tan mat dont mean heat one - I mean an embossing one for machine.. sorry for mix-up..BIG thanks! x

Related Posts Plugin for WordPress, Blogger...