
Warning... lo-oong post, details plus photos, some "how NOT to do it",too!
Hullo there everyone .. back again with another DT post for Bizzy Bec's. I am revisiting the Darkroom Door stamp set Sail Away (check out Bec's amazing prices) .. with acetate!
Here's a peek!

 And really wanted to do it with this gorgeous Darkroom Door Stamp set called Sail Away from Bizzy Bec's.
Had an idea! just needed to get past the hiccups on the way. Tried it first as shown on video linked on Loll's post. However, a video can be a problem with the memory bank.. forgot step with brayer/ rubber roller. A mistake, inks didn't blend at all, were blobby.
I'm not sure why, but her inks on acetate spread lot more than mine. Decided to change colours too ..
 Saving acetate for another attempt, will use the base, see top left, for another card one day, have an idea for it.. waste not, want not..
 So tried it way Loll said she did it, except she stamped afterwards, I'm stamping before.
I'm not sure why, but her inks on acetate spread lot more than mine. Decided to change colours too ..
 So tried it way Loll said she did it, except she stamped afterwards, I'm stamping before.
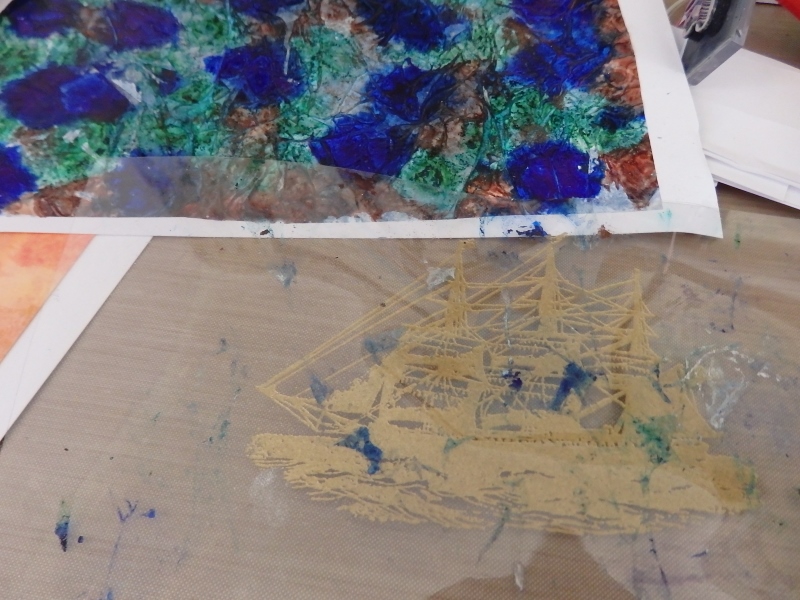
1. Using sailing ship stamp from Darkroom Door set, embossed two - one in gold, one black and two blank. (**on video the lady uses a dryer anti static cloth to prevent embossing powder go anywhere but on inked image, this is best too I found).
2. Then added the alcohol inks on the back of randomly, I also added Adirondack blending solution so my blobby inks would blend easier.

2. Then added the alcohol inks on the back of randomly, I also added Adirondack blending solution so my blobby inks would blend easier.

Used Alcohol turquoise, Cobalt like blue, Silver and Pearl.
I also added two dye inks, SU purple and soft blue. I have mixed ink types before, usually work just fine. Have very few re-inkers of various types and often mix them.

I mixed them around with scrunched up plastic or cling wrap.
Left once an interesting pattern and colour combo. Allowed to dry well.
Loll didn't do it with cling wrap, but I didn't want blobs from my blobby ink! 😊
Left once an interesting pattern and colour combo. Allowed to dry well.
Loll didn't do it with cling wrap, but I didn't want blobs from my blobby ink! 😊


4. Added the crumpled tissue over it all, then relaid the plastic wrap and ran my brayer over the top to make sure it really adhered well.
Finally happy.


Persistence paid off in droves. Have three other bits to play with, two plain.
Had funny accident with black ship image, accidentally added inks to the side that was stamped and embossed. It took some of image off randomly and left some. I looked at it and thought it looks just like a ship in a fog. I could reuse it like that, or re-stamp it on top using a positioning acetate sheet as guide, or lay a verse greeting over that part.
Had funny accident with black ship image, accidentally added inks to the side that was stamped and embossed. It took some of image off randomly and left some. I looked at it and thought it looks just like a ship in a fog. I could reuse it like that, or re-stamp it on top using a positioning acetate sheet as guide, or lay a verse greeting over that part.
Will do this technique, again. Now to my card, fairly simple actually.
 Die cut the acetate image after backing it with card stock with Spellbinders Labels 25. Added a hand cut gold base to it.

 Used two sheets of DP I bought on Thursday after my fourth specialist dentist appointments (big pennies there), spent few pennies at the only craft shop within coo-ee, ie about 30 mins north, round corner from dentist. 😊
 First Sun in Sept. is our Father's Day in Oz, so all this persistence was for my darling 88 y.o. dad.
He's worth it .. and much more.

Used the Sizzix Lattice folder on base card. Gold embossed greeting is from very old set called SU Wonderful Woodcuts, only Father's stamp I own. Used top and bottom portion of greeting on stamp (there is an image in between), with Stamp-a-ma-jig to line it it up. Took a couple of goes.
Hessian or frayed burlap across the card, an anchor which was sitting on bookcase next to my cutting machine, for no reason!!
Someone had given them to me. Perfect eh?
God is very good.
So relieved this card finally turned out just as I'd hoped.
Hope you like it too and the step by steps may help someone out there.
 | |
| Aussie shot from South Australia, they are having more rain down there, than we are ... taken by our local church's evangelist when visiting there - Fraser Young - his site here. |
Now don't forget to pop over HERE at
Bizzy Bec's and check out the other DT gorgeous creations, and please
do join in ANYTHING GOES September CHALLENGE - to win that prize.
Pop by Bec's store, too, for her great bargain prices.
Pop by Bec's store, too, for her great bargain prices.
Thanks so much every one for popping over for a peek and chat!
May God bless your day wherever you may be.
Will do my very best in commenting, and truly appreciate your visits!
May God bless your day wherever you may be.
Will do my very best in commenting, and truly appreciate your visits!
Shaz in Oz.x
"*Commit thy way unto the Lord;
*trust also in Him; and He shall bring it to pass.
*trust also in Him; and He shall bring it to pass.
*Rest in the Lord, and
*wait patiently for Him:
*fret not thyself... " Psalm 37: 3, 7a.
*wait patiently for Him:
*fret not thyself... " Psalm 37: 3, 7a.
*step by step guide to personal peace in all situations..
Linking up to:
1. Word Art Wednesday - anything goes
1. Word Art Wednesday - anything goes
 |
| Stamping Sensations Sept Photo challenge, used some of these colours in card .... |

30 comments:
Super card, Shaz. Love the image and the beautiful background you've created for it. The hessian goes perfectly with your design. xx
Wow, this is stunning. Love the gold against your wonderful blue background x
Hi Shaz, a stunning background, well worth persisting with the new technique, love the Kaisercraft papers you selected to use with the image, a great set I picked up the mini square pad last time I got to a craft store, about 45min drive from home.... thank you for the kind comments.... have a wonderful week.... Megan
Great card Shaz and fascinating to read how you made it. Love the hessian as an addition as well - it just adds extra 'oomph' :)
Thank you for coming to play in the Snippets Playground!
Hugs
Di xx
Amazing and beautiful card...love your stunning ship!
What a stunning end result, well worth the time and effort because it just works so brilliantly with the sailing ship, love it x
Shaz that is brilliant! So much work, but a stunning finished result. You are so talented.
Blessings,
Betsy
WOW what a stunner this is Shaz....love the theme and the brilliant colors
Cheers
Dr Sonia
Wow!! This is stunning Shaz! Totally worth the time you've spent on it. Looks gorgeous!
It sounds as thought you had real inky fun with this one Shaz, acetate is always tricky to work with but your finished piece is beautiful and that's a gorgeous ship image. Many thanks for joining us at Stamping Sensations challenge this month.
B x
Brilliant card and thank you for sharing how you created it. I love this technique but have done it it for years.
Thank you for sharing with us at Simon Says Stamp Wednesday Challenge x
Another stunning card and technique dear Shaz! I love the deep, rich colour and pattern which really does look like waves. Bravo mon amie!
Stunning card and tutorial Shaz..Loz
The blue background is stunning Shaz, a perfect combination to go with the ship :)
We are also in much need of rain up here on the Sunny Coast. Although I am heading down to a cold Melbourne for the weekend.
Have a wonderful week.
hugs
sharon :)
Your dad is going to just love this beauty that you have made for him and all the work that went into it. Love the way you framed it in gold also! Frayed burlap really gives it a great touch too!
Love this card. The end result is very unique and inspiring.
That's a wonderful image, Shaz, and what a stunning card you've made with it! The background behind the boat is just beautiful, and the other papers and embellishments complement it perfectly. Thank you for sharing it with us at Stamping Sensations.
Lynne
Love it! Thanks so much for playing along with our Challenge this week at Catch the bug! Hope you will join us again very soon!
Cool Background love it! Thanks for joining Catch the Bug's anything goes challenge, good luck! Dawn Bugaboo DT
What a fabulous background, and the burlap is an awesome accent for this design. I'm so grateful for your participation in our challenges, and hope you know how much I appreciate it. have a blessed week, my friend.
Karen
Word Art Wednesday
Love your card. You have taken Lol's technique and made it your own. The background for the sailing ship looks superb. hugs Mrs A.
Hello Shaz, thanks for stopping by and leaving the links. That second rose looks perfect so I'm going to indulge and treat myself. Thanks again, your kindness and time is very much appreciated xx
Happy WOYWW. A gorgeous card - and so worth all the effort you put in. Ali x #7
Morning Shaz. Great card. Well done on persevering when all seemed to be going pear-shaped! Your card for Mrs D arrived safely.
Take care. God bless.
Margaret #2
Well you got there in the end well done.
There's a travelling apron over on my desk today that started its life in oz and is currently in the uk
Lynn x 9
Your persistence certainly did pay off, what a great card it's made. Also like the alcohol 'peeled' one, looks like the black Pearl in Davy Jones' locker!! I love that you research and play with techniques so willingly, I still cant get over the thing about having to come out with something finished for my time!
'Be away for a few weeks' is a bit cryptic, I hope you're visiting and doing nice things.
Love the deep blue background, it's the cobalt blue used in Russian icons, my favourite colour! The card is a great, well done for the perseverance. Hope you're having an enjoyable few weeks away.
Hugs LLJ 4 xxx
Well worth all those steps - beautiful card! Thanks for sharing the technique you used, and all the things you learned along the way! We always learn from the things that don't work out! Have a great week, thanks for sharing, Lindart #31
Gorgeous card, Loved the tutorial on how to achieve this look... Fabulous... Thanks for sharing Have a great week... May #15
Great card and love the technique. Have a great woyww and happy crafting, Angela x16x
Post a Comment