Thank you for taking time to visit, and I hope I am even a tiny bit helpful as I have been helped and blessed by so many others. I have been doing Calligraphy since teens, and card making for many years as well. In 1990 I delighted in the joys of stamping with ink and embossing after a trip to Cairns, Qld. In 2009 I discovered the brayer, 2010 the Cuttlebug, also have now taking to reading up on crafting blogs and lo! Here I am, on one of my own.

I live on the coast of eastern Australia. I am a Christian. I trusted in the LORD down here at the beach, amazingly it is not far from where I now live. It was over 50 years ago, after a Beach Mission Service at the age of 12 years

Showing posts with label Stamping on Acetate. Show all posts

Tuesday, 5 September 2017

Darkroom Door Stamping on Acetate + Alcohol Inks - Bizzy Bec's DT post

Warning... lo-oong post, details plus photos, some "how NOT to do it",too!

 Hullo there everyone .. back again with another DT post for Bizzy Bec's. I am revisiting the Darkroom Door stamp set Sail Away (check out Bec's amazing prices) .. with acetate!
Here's a peek!
 I'm a great fan of Loll from "Stamping with Loll". Saw this post using acetate + alcohol inks.
And really wanted to do it with this gorgeous Darkroom Door Stamp set called Sail Away from Bizzy Bec's. 
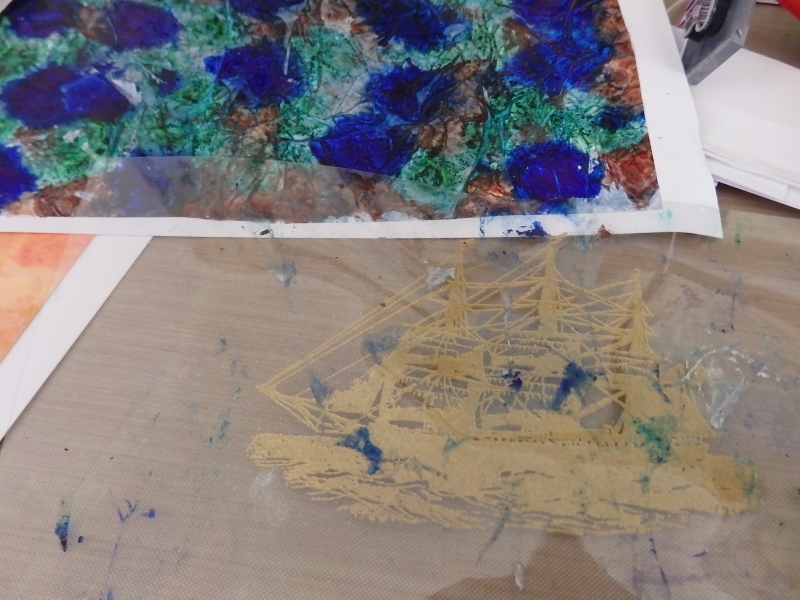
Had an idea! just needed to get past the hiccups on the way. Tried it first as shown on video linked on Loll's post. However, a video can be a problem with the memory bank..  forgot step with brayer/ rubber roller. A mistake, inks didn't blend at all, were blobby.
I'm not sure why, but her inks on acetate spread lot more than mine. Decided to change colours too ..

  Saving acetate for another attempt, will use the base, see top left, for another card one day, have an idea for it.. waste not, want not..
 So tried it way Loll said she did it, except she stamped afterwards, I'm stamping before.
1. Using sailing ship stamp from Darkroom Door set, embossed two - one in gold, one black and two blank. (**on video the lady uses a dryer anti static cloth to prevent embossing powder go anywhere but on inked image, this is best too I found).
2. Then added the alcohol inks on the back of randomly, I also added Adirondack blending solution so my blobby inks would blend easier.

 Used Alcohol turquoise, Cobalt like blue, Silver and Pearl.
I also added two dye inks, SU purple and soft blue. I have mixed ink types before, usually work just fine.
Have very few re-inkers of various types and often mix them.
I mixed them around with scrunched up plastic or cling wrap. 
Left once an interesting pattern and colour combo. Allowed to dry well.
Loll didn't do it with cling wrap, but I didn't want blobs from my blobby ink! 😊
3. Loll also used spray adhesive for attaching the crumpled tissue paper. I like my spray adhesive, so tried it, but mine was not a good hold on the acetate. 
 So tried the video technique of layering glue (mixed PVA and Tacky craft glue) on back of dried alcohol ink. 
4. Added the crumpled tissue over it all, then relaid the plastic wrap and ran my brayer over the top to make sure it really adhered well.
 Finally happy.
Persistence paid off in droves. Have three other bits to play with, two plain.
Had funny accident with black ship image, accidentally added inks to the side that was stamped and embossed. It took some of image off randomly and left some. I looked at it and thought it looks just like a ship in a fog. I could reuse it like that, or re-stamp it on top using a positioning acetate sheet as guide, or lay a verse greeting over that part.
Will do this technique, again. Now to my card, fairly simple actually.
 
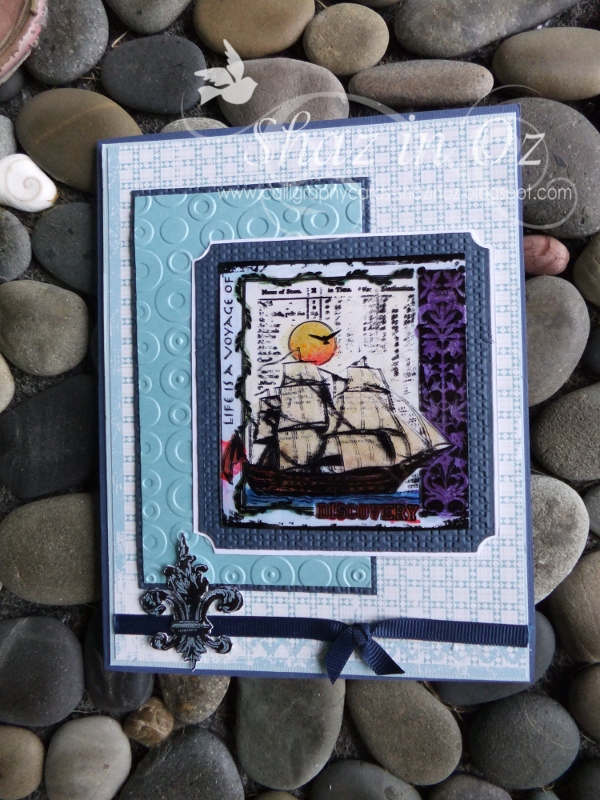
Die cut the acetate image after backing it with card stock with Spellbinders Labels 25. Added a hand cut gold base to it.
Used two sheets of DP I bought on Thursday after my fourth specialist dentist appointments (big pennies there), spent few pennies at the only craft shop within coo-ee, ie about 30 mins north, round corner from dentist. 😊 

First Sun in Sept. is our Father's Day in Oz, so all this persistence was for my darling 88 y.o. dad. 
He's worth it .. and much more.

Used the Sizzix Lattice folder on base card. Gold embossed greeting is from very old set called SU Wonderful Woodcuts, only Father's stamp I own. Used top and bottom portion of greeting on stamp (there is an image in between), with Stamp-a-ma-jig to line it it up. Took a couple of goes.
Hessian or frayed burlap across the card, an anchor which was sitting on bookcase next to my cutting machine, for no reason!!
Someone had given them to me. Perfect eh?
God is very good.
So relieved this card finally turned out just as I'd hoped.
Hope you like it too and the step by steps may help someone out there.

Aussie shot from South Australia, they are having more rain down there, than we are ... taken by our local church's evangelist when visiting there - Fraser Young - his site here.
 Now don't forget to pop over  HERE at Bizzy Bec's and check out the other DT gorgeous creations, and please do join in ANYTHING GOES September CHALLENGE - to win that prize.
Pop by Bec's store, too, for her great bargain prices
.


Thanks so much every one for popping over for a peek and chat! 
May God bless your day wherever you may be. 
  Will do my very best in commenting, and truly appreciate your visits!
Shaz in Oz.x  

"*Commit thy way unto the Lord;
*trust
also in Him; and He shall bring it to pass.
*Rest in the Lord, and
*wait patiently for Him:
*fret not thyself
...
" Psalm 37: 3, 7a.

*step by step guide to personal peace in all situations.. 
 
Stamping Sensations Sept Photo challenge, used some of these colours in card ....

Wednesday, 30 April 2014

Stamping on Acetate with Polished Stone + WOYWW

Well, it's that "middle-of-the-week" day again! Yep, Wednesday is here... sooo 'tis desk time once more... For the initiated, it takes place over at Julia's ("the Stamping Ground blog") - courtesy of our kind  hostess each week you can check out and learn from desks of the world!
Here you can see me working with a card in blue + white theme, (it's my sister in law's birthday in a few days) with a square punch for tiles. Four birthdays in eight days... mm, needs must make cards for each! And two are decade birthdays to boot, so that means a special celebratory poem inside as well! Will share completed card once birthday is past.
The inspiration came in part from this card here from Veronique of OSA for "Any other fold but half" mingle - the blues and half cut out image caught my eye, then saw Irene 's snippetty "inchie" card over here - and hence an idea above began.
Wonderful card by Veronique in Oz - OSA mingle
.. my card for this mingle is this one with Artneko dragonfly stamps including kanji and haiku poem, stamped on acetate with Stazon over polished stone background shown back on desk here.
This is another set from Artneko of Christian stamps - also used on this post here and here and here. Double embossed background shown on this WOYWW post here. 
The image of the little Asian girl praying is a Jessie Wilcox image of children praying .
Over at Allsorts their theme is Oriental, which fits perfectly with these last two cards.
To close here is the image from Oz.. had huge chuckle when saw this on a walk.. 
There sits dog on towel while master takes a dip! 
It reminded me in a way of the way the LORD watches over us, too but His eyes are all seeing (omniscient) so it is a limited comparison.
Well, almost short and sweet as have to get back to real work :D  Commenting is limited as have two commissions not started (an illuminated text) and cards, five in all, so must move along. May God bless each of you this day in all that you do - and thanks for popping over and making my day.. you bless my heart, 
Shaz in Oz.x

Would like to join over with 
1.Di's Snippety challenge - Used snippets on both cards.   http://pixiescraftyworkshop.blogspot.com.au/ 
2 .Allsorts Oriental weekly challenge
3. Word Art Wednesday - anything goes    http://wordartwednesday.blogspot.com.au

Wednesday, 25 May 2011

WOYWW - What's On Your Workdesk? Wednesday 103

Well here we go flying through another week and rapidly heading toward to the two year anniversary of next week, so I had better get my skates on and finish that pIf, hadn’t I? .. here is some more work in transit on my desk. Today on left side, I am starting a small order for Morti of WOYWW fame, and a surprise her mother; so you can see its beginnings on the left hand side there, all pencilled in waiting for my ink Have finished the one I was working on last week and I  have posted it below. I’m working also on another large one which is an order for a wedding.

I will show it to you next week all being well it is inked in just waiting for colours to be laid down.
It did not take long to get to that stage as I had done it before and did not have to work from scratch, just copy it onto my sheet from the copy I already had here, which makes me very, very happy!!
Now you can see my faithful bug on my desk which is still chugging along and also there are two cards in the process of being made for Fat Cats Card Corner. Both are Crafty Individuals Stamps - one is the lovely Robin or bird one.. I think it is a generic bird, but for this one I decided to make it Robins and stamped it on acetate. I used the Nellie Snellen Doily lace die also on this and the Epiphany Button Studio with the button there. Method explaining acetate stamping and gelly roll pens here, and also did the gorgeous sailing ship the same way. You can see some nautical print outs which are freebies from Far Hill (see side bar link to them) which I think I will use on assembling the Sailing ship card.
Thanks for looking and if you want to know why I am showing you my workdesk - do pop over to Julia's Stamping Ground and share in the fun of our blog hop around the world’s desks! You will learn lot! I have in my brief time sharing each week!
God bless your day,
Shaz in Oz. x


PS just want to apologise to anyone who wondered what happened to their comment, Blogger ate some last week and they are still missing so wasn't cos I deleted them. Poor old blogger has had a rough time lately!
PPS. this morning I finished off the cards so posting them here in their complete state. As we are ages ahead of UK and have a very busy afternoon, I will be late linking over today too. Elements in ship card as follow, DP Kasiercraft, Cuttlebug folder Spots and Dots, Large labels from Nesties extended. Also used an element from Far Hill Digi Freebies mounted on card, cut out and added Glossy Accents.
PPPS. the bubble thing on my desk that Sarpreet asks about is my clip on magnifier I need to use for my calligraphy - as eye sight aint what it used to be!

Wednesday, 27 April 2011

WOYWW - What's On Your Workdesk? Wednesday 99

Well, another big BLINK!! and here we are ready for another mid week blog hop on WOYWW, starting over at our hostess’ Julia’s blog for link up at to all the wonderfully inspiring desks around the world... Come and join in the fun at Julia's Stamping Ground!

As you can see my desk is littered with the Illuminated Bible text I am working on! For those of you struggling to read what it says, it is a very beautiful and meaningful verse from: 

Ephesians 4 vs 32
Be ye kind one to another,
tenderhearted, forgiving one another,
even as God for Christ's sake hath forgiven you.

Some progress has been made, thankfully design or layout is sorted.. but a long way to go! I can’t wait till have finished inking it in and then the fun part of laying colours down. This can also be very tedious but really life is full of that and you just press on. To make it more interesting this has a deadline of our Mother's day which is May 8th, and I have come down with a cough and cold!! Never a dull moment here! All more reason to pray; so all prayers for skill, strength and wisdom gratefully appreciated folks..

Here a few cards I have made this week as break from brain strain of text work, plus felt had to do another one for Fat Cats. I actually read Neil's post and thought of using this stamp ( for Neil's post link see here ). However I dont have his lovely Impressionist/Expressionist style, and so it took on its own shape. The Damask Duck is stamped on white card in black pigment ink, clear embossed then coloured with mixture of Caran D'Ache watercolour pencils and Pearlex watercolours for that shimmery sheen (you can see my Pearlex above right of desk with my piece of calligraphy - very small paintbox but colours that have real punch, I love them!). 
Stamp the same stamp on acetate with black Stazon, allow to dry overnight or heat dry if that sort of acetate.

I actually just used some scrounged acetate I found on boxes of cards and even the few scuff marks did not matter so use what you have don’t rush out and grab some expensive acetate!

Colour back of acetate with Gelly pens for extra depth ( or even Stickles as Neil did below on his post - see below link).
Then attach to original stamp ( I used Glossy Accents after reading this idea on Neil's glorious ideas filled blog see here -but you can also can use brads). Attached to black card which was highlighted linen look stamp from Hero Arts stamped with Versamark pad and embossing powder Iridescent. Cut with Spellbinder Square Scallop die.

Used Script Cuttlebug folder distressed with sanding block for extra dimension and designer papers for layout. I have done it various way just try it out..

 
Another layout was tried also..so play around and have some fun...
Meanwhile I must get back to work on my text and do a bit of blog hopping later when the rest of the world catches up with us over here! 6am UK is 3pm here! Have a Manchester, UK clock (where my family are - to know when to ring them!) on my desktop for all those who wonder how we figure it out..:D

May God bless you day everyone and a very happy WOYWW!
Shaz in oz.x

Thursday, 3 February 2011

Our Daily Bread Challenge / Christmas Card Challenge - Brayer on Acetate

Well here is my entry to two challenges - and hopefully make the cut off date for both.

As per my post yesterday one of these had working with acetate (2011 Christmas Card Challenge Week #9) and the other is with Our Daily Bread  -blues-challenge

The acetate was a challenge in more ways than one! I used Archival Jet black on the acetate for the tree stamp from Victorine Originals in the US (and did two stamps for two cards, with two moons on post-it notes circles if you look at last post on the original brayering). The black stamp did not take long to dry, you ink on one side allow a few hours and then colour on the reverse side to which you have stamped.Brayering on acetate?!..

Well it was a learning curve! I sprinkled the brayered ink on the back with extra fine glitter and attempted to set it with a spray glue..But this did not totally take, however by using brads to attach there were no real issues here.

As there was insufficient brayered colour on it, underneath the acetate I attached Stampin Up Glossy White cardstock, upon which I had brayered the same colours as on acetate.  I was using Broken China and Adirondack Lights in Cloudy blue and Cool Peri and the Twilight Purple too - just very tiny bit at the top and carefully and gently blended that it in, as it a very dark colour.  Our Daily Bread Greeting was stamped on Labels 4 Nesties, coloured with Bashful Blue and mounted on Black, the Snowflake Cuttlebug folder is also in Bashful Blue.

Well, I now have another one to finish as I did two acetates at once, so two more Christmas cards on the way.. Yay!

This is my very first lot of Daily bread stamps which I used for first time today and must say I was incredibly pressed with their quality. I have been stamping for 18 years and they are some of the best I have ever used, and also I love the calligraphic style of the beautiful words of God! I do particularly like this Christmas set.

Thanks, Our Daily Bread.

 God bless till next time and rejoicing that it was not worse with cyclone Yasi – answered prayer but still so much devastation so I am praying for all in the clean up, and post trauma.

Love Shaz in Oz. x

Oh, and a big special thank you to my new following encourager's! I am still pinching my self over some folk liking my work!!

PPS A note from Maggie C. Silvercrafter :

Thanks for sharing . I have not tried brayering on acetate, but I have printed on it and then coloured in with Sakura pens, which works well. I have also used peel-offs, flowers and that sort of thing, and coloured those in from the back. A third method is to scan a stamp onto your computer, flip it digitally, and print it on the acetate, and either colour it or add silver or gold leaf to the back. The scanning of the stamp should not be done if you are doing it for sale, and it could be a good idea to ask the designer if they are ok with you adapting their design in this way (I asked Barbara Gray and she was fine with it as it was not for sale).

Thanks Maggie!

PS. Here is the second card, and yes! I know - it was late at night (any other late night crafters out there?) when I put the final piece on card, top piece of acetate and was on a little to the left before I realised and could not adjust it (sigh, at least it was straight!) it gripped, never to be removed. 

Changed the layout and background, used the Herringbone Embossing folder as love it with brayer work, and used my "extend the folder" method (see side labels) as it is only a small A2 Cuttlebug folder and this piece is almost double-sized, then attached a Fancy labels from Spellbinder to the sentiment just for added detail, and a chiffon ribbon.

Like a change anyway, and really will do this acetate again one downside it does not photograph colour evenly and apologise for that!

Related Posts Plugin for WordPress, Blogger...