Thank you for taking time to visit, and I hope I am even a tiny bit helpful as I have been helped and blessed by so many others. I have been doing Calligraphy since teens, and card making for many years as well. In 1990 I delighted in the joys of stamping with ink and embossing after a trip to Cairns, Qld. In 2009 I discovered the brayer, 2010 the Cuttlebug, also have now taking to reading up on crafting blogs and lo! Here I am, on one of my own.

I live on the coast of eastern Australia. I am a Christian. I trusted in the LORD down here at the beach, amazingly it is not far from where I now live. It was over 50 years ago, after a Beach Mission Service at the age of 12 years

Friday, 25 February 2011

Great tips from Kerry and a Freebie!


Quick post today was reading on dashboard and saw that Bearly Mine Designs had their February Freebies out so thought you might like to see them!!


Quite a few beautiful sheets if you wish to check it out!! (also in the post below had another lot of Digi paper freebies..)
YUM!

Oh, and also saw a tip in WOYWW hop about embossing pearls and brads thought folk might like it - it was on Butlers Abroad by Kerry  (comment no. 32)
Pasting it here :
I love the photos of where you live, before and after the snow. 
You asked about embossing the little pearls. I stuck them on the end of a piece of card stock, so my fingers were far away from the heat gun, then dabbed them in Versamark, the dabbed them in the powder, then heated them. I gave them 3 coats. I’ve done the same with brads, but held them with a pair of pliers.
Comment by Kerry — February 24, 2011 @ 2:50 pm | Reply

If I knew who Kerry was, I would give her page the credit as she obviously had something about it on her post. 

PS. Courtesy of Brenda's reply below here is Kerry's blog everyone! Check out her amazing cupcakes with RED cherries on top.. how clever is that!

PPS Tip number two from Kerry blog is how to make your own texture plate with Chipboard - wow this wonderful! see  here.

Wednesday, 23 February 2011

What's On Your Workdesk? Wednesday 90 + Jude's candy!


Well not much on the work desk this morning, as you can see.. quite a barren landscape. Zero, zilch, zip in craft has been done since last post in cards, and I have not even my attacked my calligraphy, however can show you a few things which I have finished off last week..

You will see two cards and the printouts of DP from a great new free digi site I have found love this blue set they are from Far Far Hill .
There are vintage ones and also florals - a good variety to check out!
This week at classes with calligraphy we are doing cartouches as we are doing Egyptian script in this term along with Carolingian, so in weeks to come may show you my own cartouche as we have to design our own ( definition of cartouche -  An oval or oblong figure in ancient Egyptian hieroglyphics that encloses characters)!

I have posted here my brother in-laws card which I started on last weeks post.
His was made with the foil from the top of the Cottage cheese, finger-rubbed (messy, huh!) with Gold rub and Cuttlebugged with two different folders (Textile and Argyle ).The brown folder underneath is the Distressed Timber one from Cuttlebug and also the punched out motif was edged in perfect pearls,


 I have made a baby card (below) for some friends, which has the baby Cuttlebug folders on it and rubbed with chalk pad to emphasise the writing as I love it so much and did not want to cover it up; checked ribbon down side + Nellie Snellen die on edge and a vellum cut out of Jemima Puddleduck from a book of Vellum pictures of Beatrix Potter - I picked up at throw out price at Spotlight. I do so love Beatrix Potter, and very happy to have been to her farm, one superb day of joy in 2009!


The last card is another of my teabag folding cards and the colour in the teabag folding (also Australian flowers on this one) dictated what colour I would use on it. So orange, lime green and black it was and made for a very different look! I used ribbed cardstock for the base and black vintage corner by Cuttlebug and the Nesties in a round and scallop in the centre. Fancy labels for the sentiment. ;also used a  Cuttlebug folder Bubbles to cuttle the centre piece, upon which the folded piece sits.


Thoughts and prayers of all of us are with the folk in Christchurch, I know folk over there and dad has cousins but think (and pray) all are safe.. Praying for those who are helping over there, too, skill and wisdom in the task!

And in case you dont know what WOYWW is drop over to our hostess Julia and join in the fun of WOYWW, drop by Julia's Stamping Ground! 


PS Awesome candy (see above!) over at Jude's - check it out!

Wednesday, 16 February 2011

What's On Your Workdesk? Wednesday 89 + Our Daily Bread Challenge x 2!

Well folks, here we are again! 
I did my calligraphy post as promised for last Friday you can view it here. : D , and now  I have been busy doing a couple of friends birthday cards (I seem have quite a few of them and there is quite a run of birthdays!!) And you cant see Nesties on this table 'cos they are tidied away.. and thanks to all folks who tipped me off on Nestie storage, I have bought the magnetic tape. A big thanks to Susan  @ Stamp on Me my Nesties are all nestled in their home nice and tight NOW! She told me in her comment of the magnetic tape you can buy from Spotlight so off I went and now they are all fixed up nicely.


 Once I complete two more birthday cards I will have to have break from cards and do some calligraphy and also do a chart for our church group I go to, I do one each year. It takes a few hours work, I have to print the photos off for that as well,.
Now today’s table shows some work being done - in right hand top-corner you can see I was playing with foil and embossing it and trying out method of colouring mostly without much success, the foil was strong sort, from a lid off a yoghurt container. Last week on WOYWW RosaC of Paperchase  told me she used metal wrapper saved from some bubbly bottles and put through the Cuttlebug. Not using wine myself I asked my family to save it for me, but they said no, in Oz we have gone over to screw tops as it seals much better than corks and foil. Mmm! So next best thing I came up with was the yoghurt top! The Perfect Pearls coloured it very well, as pictured in lovely turquoise, and so did the Rub On gold - see small squares on the half completed male card, but rub on gold was very messy to do, (the card is now finished and looks great will post later)...
My purple toned Distressed card ( posted below), is a challenge entry for OurDailyBread ODBDSLC47 "Have a H.E.A.R.T." recipe and also an entry in the Our Daily Bread Designs Stamping In Time: On Assignment Challenge(SNTODBD28). The latter simply required to be distressed in some way and is made for someone who has been through stress. (Tick! times two!)
"Have a H.E.A.R.T." recipe.  You must use three of these ingredients.
H= Hemp
E= Embossing (tick)
A=Any Our Daily Bread Images or Sentiments (tick)
R= Ribbon or lace (tick)
T= Tearing or distressing (tick)


My card was not as distressed as I planned, ‘cos I was so stressed over not cutting mount straight and der! I forgot to stress edges with purple ink on pale bubbly background sheet, rather an irony that! :D
However I did distress the white core dusty mauve paper with the Cuttlebug Daisy pattern on it, so white daisies showed through. I like my new Stampin Up distressing blocks; they work wonderfully well. The card was to be made for someone who has felt the stress of life and my dear Jen really qualifies in this!
In case you can’t guess Jen loves purple, bling, flowers and ribbon (it is purple, but photograph looks pink!) so she had to have all four, of course. And I also used the ODB verse on the marbled brayer piece I did a few weeks back, see here if you want to see the method of marbling with brayer. So guess there is a bit more distressing there!
I used wavy rectangles in my Nesties and figured they were a good distressed shape too! 
 
 My other friend whose birthday card I have posted here as well loves pink and so I have used one of my teabag folding pieces. I love this one, cos it has gumnuts and gumleaves on it (found a sheet of Australian native flowers for teabag folding ). As Steph calls me Gumnut,  I thought it makes it doubly appropriate. The corners are Vintage corners from Cuttlebug, and the outer centre is my Blossom Nestie cut twice in different colours and interlocked and then another scalloped circle on the bottom, The Cuttlebug folder is “Kimmy Luvs".
Oh and to the observant among you, you will notice I have acquired a new watermark... thanks to Jocelyn for her wonderful emailed instructions which helped in applying it with Gimp (a free download) and to  Karen Giron a lovely design for very low price. Thanks so much ladies, not being really cluey on these things it is handy to have web friends who help you so wonderfully. God is good.

Oh and to join in the fun of WOYWW, make sure you drop by Julia's Stamping Ground! 

See I am learning lots of things with my weekly visits, and as I was told, warned, etc - it IS addictive! 

Oh and look see! my brand new ATG gun has just arrived, now off to play! yee harrr! 

Big thanks to Susan Maloney and butlersabroad Brenda of  WOYWW fame! 

Brenda told me Susan had one for Christmas sent to her here in Oz.. Susan told me where she had bought hers from a few weeks back.... ah, sooo spoilt! thanks to all, everyone etc, you are so much appreciated!!

Friday, 11 February 2011

Calligraphy – ah, early days are here again!

Well you may be puzzled by the heading but the meaning will come clear as we proceed. First of all I wish to apologise for the delay in this post! A dentist visit and two fillings were not the nicest part of the day, however at least it is now behind me and have the weekend ahead! Yay! Think a pop down for swim tomorrow at my spot might be on the agenda!

This verse I am posting today refers back to my childhood, and memories of the spot where I now live.
I have done it quite a few times now and have really lost count I am afraid. The reason I have this verse hanging in my lounge room is really quite simple.
I learnt this passage from which it comes to win a book prize I must confess and I conned my sister into doing the same.. just so we could have two books to read. They were a little like hen’s teeth in those days and highly treasured. I still have that book!
 
The photo of the first execution of this verse was going to be posted with this today but have loaned the photo to someone. I will add it later. It is very different. When I first started I did my texts in Watercolour with gold ink in the ink section. Then I learnt how to use gold leaf and then progressed onto gouache instead of watercolour.
The main reason for this is the colour-fastness and general blending capabilities of Gouache is far superior to watercolour for my work. I will show you in the next post the only other text I have in my house. I only have three which I have done, I seem to give them away, or sell them! The watercolour one is my earliest work I have from about 1988. This text was done in 2001, and since then a number of times at least three I can recall. The photographs are taken from the last twice I did it (2008/2010), as they are digital.
 After learning this passage (1 John 1: 7-9: 
"If we walk in the light, as he is in the light, we have fellowship one with another, and the blood of Jesus Christ his Son cleanseth us from all sin
If we say that we have no sin, we deceive ourselves, and the truth is not in us. If we confess our sins, he is faithful and just to forgive us our sins, and to cleanse us from all unrighteousness.") 
I was walking back to the tent with my sister’s teacher (yes, we camped here annually for over 20 years, near the beach where I now go swimming).
It was the Children's Special Beach Mission who came there each year, or CSSM as we called them...
My sister’s teacher was asking me as we walked back if I knew what these verses meant. Being 12, I had not really given it deep thought, but as we walked she explained how Jesus had died for all our sins, including mine on the cross and asked me if I would like to take Him as my Saviour. To which I said yes, and so here is the spot (today’s photo) of where I prayed and asked the LORD Jesus to be my Saviour all those years ago. It is kind of hallowed ground to me. I remember I was told that the angels were rejoicing in heaven over a soul coming to Him. My mother burst into tears when I went back to the tent and told her.
Years later (in my 20’s) I asked her why, she said because you looked so happy. And I was. I went down to the beach and sung my head off!! The promise of my home in heaven was what I had found, and a Friend Who would never leave me nor forsake me! No wonder I was so happy. I have found joy where joy would not be possible, in the simple faith of a child believing God and His word.   


I am so grateful I found the LORD early, as I had much hardship and sorrow ahead in my teens especially and only made it through with His help.

Here is a little closer detail of the ornament of the gold leaf. I will try to explain how I do it briefly but in later post I will show it step by step as I have photographs taken of each of the stages to help my students.

I never work first on the paper as I make too many changes and save good paper for the final draft. I work on tracing paper like Architects use, heavy duty in large sheets.
This design is totally original but I have copied  especially in my early days.


The outline takes about half the time and one this size takes approx. 50 hours work, it is like four times A4 in size. I have an order for a new verse of this size and smaller A4 size one, must get onto those!
Once the outline is done (and when you do repeats you can thankfully skip this stage because you have a top-notch copy on tracing paper) it is transferred to final paper (which is usually 100% rag not paper in the strictest sense). 
Then inked in, painted with the blending style (when doing one like this) and then the gold leaf is built up using the glue size and once it is the right level, the gold leaf ( 23 carat) is applied. Then it is re-inked in black, framed and mounted. The blending is very tedious and on my second post you can see how I blend as my blending sheet is shown – I put my work desk up on that post so if you are interested check it out (please click here). It may surprise you to see just how I work! Or those who know me - it will not.  : )

I pray much about the layout and emphases of the Word of God. You will notice I have a capital "A" for the "ALL" sin, and this is for emphasis. As the tabernacle was a picture of Christ's coming, I have also used the tabernacle colours for this verse, the scarlet, purple, blue and gold.
They go so beautifully together. I hope this rather long post has not been too wearying and a great many thanks to all those who have shown interest.
May God bless your day wherever you may be!
 Shaz in Oz.x


PS. I always seem to have PS these days on my posts!! just for you, Lizzy! and many heartfelt thanks also to other dear Encourager's too! you are such a blessing to me.
If you want click on this picture (Lizzy and others) as I have not reduced the size other than to crop it so it will be very large and thus come with all the detail in visible size.

love Shaz.x

EDIT: 2018 Taken me a while to edit this but here is the original of this verse done so many years ago now.. 

Wednesday, 9 February 2011

What's On Your Workdesk? Wednesday 88


Mmm, this has had to be a very industrious few days.
Notice my chief supervisor there, sitting next to my cute green bug... my Love bear, full of great ideas!
You see, I had this order sitting around for several weeks, and instead of doing the four cards on the order I had played around with things I wanted to play with!
But I have finally knuckled down and here is what my table looked like a few hours ago ( it is now cleaned up as had to..).. Oh! and in the cleaning up I nearly had a heart attack!!
I was taking my rubbish out to the bin in my clear plastic gag… thankfully this time it was a clear one from my cereal; as my little eye spied in the corner of it at the bottom of the rubbish bag….


EEEKKK! A spellbinder! This is my one terror, I will loose a piece and always praying about it.. And just as well, as this was a very close call. So the Petite Scalloped Oval smallest piece was safely retrieved. This is the second time it has gone AWOL (and the only one to do so, and on two occasions now!). Last time it was another mad panic and found it in another spellbinder.. whew, again! I breathed another prayer of deeeep thanks!

Now I had a birthday card to make for friend in Japan so thought this one with teabag folding on it and the cherries in the pattern was rather appropriate for her. I hope she likes it and the cherry blossoms should be out soon over there. (see no 1 card)
 Guess they will be hanging out for spring's arrival like everyone else!
 And then there are the two I have made for the order and so glad to have done them; now I have to do the poems for the insides, and then envelopes and finished, phew!
If you are wondering what the other two are like I have posted them already - second card on my brayer and Stampscapes post here and last card on mock marble brayer one here.

Always so nice when I have them ready for delivery.

 And for those of you who saw the acetate stamping on last week's WOYWW post it was finished satisfactorily on a previous post! thanks for everyone's tips on it, too!

For those of you who like calligraphy posts, I will do one on Friday, this week, God willing.
To join in the fun of WOYWW, make sure you drop by Julia's Stamping Ground!   


Happy WOYWW, everyone!
 
PS ah! I always want to know myself, and have been asked so here goes!!
INGREDIENTS: 
Card 1: Embossing folder is Cuttlebug Kimmy-Luvs embossing folder, and using Nellie Snellen lace die and the Nestabilities on the centre piece.
Card 2: "thanks" - Cuttlebug Embossing Folder "Bubbles", same Nellie Snellen Die on Lace Doily centre {and used the Lace border die on the last card ( I do love these Nellie Snellen dies)}.I have arthritis and can't use punches but dies are great so was excited to discover these. The corners of this card are from Cuttlebug vintage corner set. Have extended the border and all the folders with the same method I used on my enlarging folders post.(see labels at sidebar)
You just practise first to get methods right for each folder, as they are different. All are extended more than A2 size.
The "thanks" is stamped on the new Spellbinder Fancy Labels set and so are the scrolls on Card 3 "With Love" on the last card, it is mounted first with the Petite ovals and Scalloped ovals on top of the scroll ends of the label. I used the Cuttlebug folder from "Love" set. The flower and bird border on this card (click on it, it is absolutely beautiful) was a pre-made one I picked up very cheaply in Sydney on a doctor's visit.. at my calligraphy shop " Wills Quills".. I love that shop!!
PPS thanks to Susan @ Stamp on Me my Nesties are all nestled in their home nice and tight NOW! She told me in comments below of the magnetic tape you can buy from Spotlight so off I went yesterday and fixed them all up right and tight last night.. now just must remember to pull them off the cardboard outline and put each one away each time. See how useful WOYWW is! thanks craftie buddies!


It was leaving  the cardboard on it that was the problem as it was face down and could not see it!  Calligraphy post maybe a tad late as busy today was supposed to get it ready last night but went out..sorry!

Tuesday, 8 February 2011

A Wonderful Blog Award Received


Good morning everyone,

Once again I am thrilled and delighted to have been given an award.

  Elizabeth of Silverscrappers blog made the award a couple of days ago – thank you so much for thinking of me, Elizabeth.
I met Elizabeth on our WOYWW blog hop (thanks to the lovely Julia) and I love her gorgeous cards and very encouraging comments. It's always so very lovely to receive other bloggers recognition, so thanks so very much Elizabeth!

In accepting this Award, I am required to tell you 8 things about myself and then pass it on to 8 others.
Um!! ar! I don't like sharing much about me, cards are much easier but here goes..this is the tricky bit, I tell you!! deep breath and here I go! {you can skip this bit if you like! : )


1. I trusted in the LORD Jesus as my own Saviour down here at the beach, amazingly it is not far from where I now live. It was over 40 years ago, after a Beach Mission Service at the age of 12 years.

2. I thank God for my wonderful family. I think this is the most special part of living here in spite of being in such an idyllic place.

3. My first card was made at kindergarten with help of my teacher for mother’s day.( I guess there were 40 others too that day!)

4. My first piece of calligraphy was done at 15 and I still have it. May post it one day!

5. My favourite dish is Chicken and Cashews, with fair dinkum fluffy rice. (Aussie slang fair dinkum = real deal)


6. I have a UFO (UnFinished object) I started in 1988 and still not completed– a crocheted lace tablecloth,47 squares done and two to go! And been there for three years!


7. My favourite crafting object is my cute little green bug, yep! a Cuttlebug!

8. I have very tiny hands which people sometimes comment on to my great embarrassment!

Finally A REALLY big thank you to all these inspiring folk, my chosen eight are :

1.Eileen    - for always encouraging me in my efforts, and for her magnificent brayer work  I love!.

2.Ikki's Cuttlebug Cupboard- Ikki started me off with my bug and really thank her for ALL her inspiration over 12 months of following her. I never knew what blogging was till I was given a link to Ikki's blog.

3. Lizzy Giggs for never failing to send a word of encouragement and her wonderfully gorgeous cards!

4. Marcelle encouraging me to live for the LORD as I work on my creations, as she does on her wonderful blog!

5. Tania for giving brilliant tips and ideas, thinking outside the square!

6. Karen  for her beautiful and inspirational work

 7.Jodie from oz For  her gorgeous Magnolia cards.

8.Lisa another crafter whose work inspires me.


So thanks very much everyone, I had more than 8, but had to chose - I truly appreciate you all more than words could ever say!

God's blessing on your day!

Thursday, 3 February 2011

Our Daily Bread Challenge / Christmas Card Challenge - Brayer on Acetate

Well here is my entry to two challenges - and hopefully make the cut off date for both.

As per my post yesterday one of these had working with acetate (2011 Christmas Card Challenge Week #9) and the other is with Our Daily Bread  -blues-challenge

The acetate was a challenge in more ways than one! I used Archival Jet black on the acetate for the tree stamp from Victorine Originals in the US (and did two stamps for two cards, with two moons on post-it notes circles if you look at last post on the original brayering). The black stamp did not take long to dry, you ink on one side allow a few hours and then colour on the reverse side to which you have stamped.Brayering on acetate?!..

Well it was a learning curve! I sprinkled the brayered ink on the back with extra fine glitter and attempted to set it with a spray glue..But this did not totally take, however by using brads to attach there were no real issues here.

As there was insufficient brayered colour on it, underneath the acetate I attached Stampin Up Glossy White cardstock, upon which I had brayered the same colours as on acetate.  I was using Broken China and Adirondack Lights in Cloudy blue and Cool Peri and the Twilight Purple too - just very tiny bit at the top and carefully and gently blended that it in, as it a very dark colour.  Our Daily Bread Greeting was stamped on Labels 4 Nesties, coloured with Bashful Blue and mounted on Black, the Snowflake Cuttlebug folder is also in Bashful Blue.

Well, I now have another one to finish as I did two acetates at once, so two more Christmas cards on the way.. Yay!

This is my very first lot of Daily bread stamps which I used for first time today and must say I was incredibly pressed with their quality. I have been stamping for 18 years and they are some of the best I have ever used, and also I love the calligraphic style of the beautiful words of God! I do particularly like this Christmas set.

Thanks, Our Daily Bread.

 God bless till next time and rejoicing that it was not worse with cyclone Yasi – answered prayer but still so much devastation so I am praying for all in the clean up, and post trauma.

Love Shaz in Oz. x

Oh, and a big special thank you to my new following encourager's! I am still pinching my self over some folk liking my work!!

PPS A note from Maggie C. Silvercrafter :

Thanks for sharing . I have not tried brayering on acetate, but I have printed on it and then coloured in with Sakura pens, which works well. I have also used peel-offs, flowers and that sort of thing, and coloured those in from the back. A third method is to scan a stamp onto your computer, flip it digitally, and print it on the acetate, and either colour it or add silver or gold leaf to the back. The scanning of the stamp should not be done if you are doing it for sale, and it could be a good idea to ask the designer if they are ok with you adapting their design in this way (I asked Barbara Gray and she was fine with it as it was not for sale).

Thanks Maggie!

PS. Here is the second card, and yes! I know - it was late at night (any other late night crafters out there?) when I put the final piece on card, top piece of acetate and was on a little to the left before I realised and could not adjust it (sigh, at least it was straight!) it gripped, never to be removed. 

Changed the layout and background, used the Herringbone Embossing folder as love it with brayer work, and used my "extend the folder" method (see side labels) as it is only a small A2 Cuttlebug folder and this piece is almost double-sized, then attached a Fancy labels from Spellbinder to the sentiment just for added detail, and a chiffon ribbon.

Like a change anyway, and really will do this acetate again one downside it does not photograph colour evenly and apologise for that!

Wednesday, 2 February 2011

What's On Your Workdesk? Wednesday 87

 
Well another week has flown by! and a whole month to boot, as we enter February gone is January and all the things I was supposed to do in the holidays (we just finished summer hols here)...well, some of craft things were done, reading, a few other minor items but not the sewing, mending etc. etc!


More prayer needed as far north Qld is about to be hit again!... this time a category 5 cyclone Yasi (that is as bad as they get, none higher category than 5!) is due in Cairns and Townsville about 10pm this evening, eastern standard time. I am in northern NSW and so are my family but do have friends in Cairns so I am praying hard..mass evacuations again! (Latest update: On this evening's news on ABC said it is as big as Hurricane Katrina and Qld has never seen one this big in recorded history - sure pray these stat.s are wrong!)
Here is my mess this morning! I am trying out a new project and still not convinced I have mastered it. I was reading up on challenges (which I always end up doing too late) but this one said to use transparencies. Now I was totally oblivious to the method of stamping on acetate and colouring; so master Google and You-tube came to my rescue. I had nothing like the stamps they “demo-ed” the method of course and so thought I would give to go with brayering. But not sure it has worked - you will have to wait and see with this as waiting for it to dry at present that is one thing it does not dry quickly!! You stamp on one side with Staz-on or similar ink pad and then colour on the other side. I think the colours will not be strong enough and may try an underlay with the colours I want.
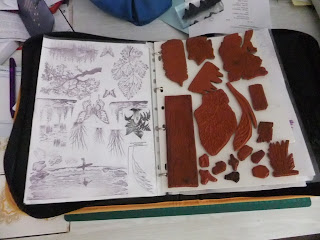
I am also showing the way I store my unmounted stamps as last week I promised Karen @ Stamprr I would post a pickie as she asked me about it.
Last week Karen was mounting her unmounted stamps and storing them on the back of laminated sheets. I told her of the tabbed Ez mount divider sheets and folder I had mine in. it is actually an ordinary high school type ring binder we use over here. But is it zippered one (i.e. has a zipper all around it to close it up so nothing falls out) and has extra pouches in the front and back where I stick the clear ones on sheets..
If you have laminated sheets so there is nothing to stop you just punching holes through the A4 sheets and then putting them in ring binders too. I have categories (eg Christmas, words, flowers, scrolls etc) and st
ore it that way. This link here has the tabbed storage sheets and these are the ones I have. 
To join in the fun of WOYWW, make sure you drop by Julia's Stamping Ground!   
Happy WOYWW, everyone!

PS re. the acetate and drying times, I will update on next post (God willing!) as it has been a steep learning curve..but looking better than I hoped at one stage there!! I was going to chuck it but I am stubborn as they come and tried another way! in on my hot-water hater drying after gluing now..any tips if you have done this are appreciated!! :) 

PPS Thurs. 3rd Feb.
Oh and to see the card finished look in post above as it is completed and quite happy with it!! 
Related Posts Plugin for WordPress, Blogger...