Thank you for taking time to visit, and I hope I am even a tiny bit helpful as I have been helped and blessed by so many others. I have been doing Calligraphy since teens, and card making for many years as well. In 1990 I delighted in the joys of stamping with ink and embossing after a trip to Cairns, Qld. In 2009 I discovered the brayer, 2010 the Cuttlebug, also have now taking to reading up on crafting blogs and lo! Here I am, on one of my own.

I live on the coast of eastern Australia. I am a Christian. I trusted in the LORD down here at the beach, amazingly it is not far from where I now live. It was over 50 years ago, after a Beach Mission Service at the age of 12 years

Showing posts with label Cuttlebug. Show all posts

Wednesday, 26 May 2021

Snippetty Male 60th Card, RE-SUBSCRIBE + WOYWW

 Well, am very sorry indeed for lo-o-ooong silence here. First of all...

ARE YOU GETTING THIS POST BY EMAIL? If you are, or would like to subscribe by email, you need to see this post HERE. (Thanks to those who have, you’ve really truly blessed my heart)

 If you blog and use blogger Feedburner you also need to check that post out! No emails sent of our blog posts from July 1, 2021. I’m very happy with how new system is working. It’s been very encouraging actually. For WOYWW, as tis Wednesday, pop over to Julia’s Stamping Ground!

My desks earlier in the week, I had a male card to make for a special decade! 🤔😝 at this stage I’m trying to make up this vague “simple” card idea in my head .. you guessed it, it was NOT simple. Way too much die cutting for comfort really.
This is stage two, when have figured out layout and die wise, now just doing unlimited (it seems) cutting. The card idea was stimulated by his sister’s comment that he was in denial cause he kept saying the wrong decade!

Here is the finished card and the background is printout snippet not used on another card, along with most of other card except the base. (So off to the Snippets Playground, yay!).
Also I print out an insert to go inside the card, like in bought cards. This what I wrote.

Australian sights: Just quickly, yesterday out walking, I spy a lorikeet in a flowering paperbark, a beautiful melaleuca.

And then sun setting on Sunday evening here in town, isn’t that beautiful?

.. love autumnal lights, truly they show the creative power of the Creator. Look around your room, house, car everything there had a creator .. a hand that made it?! And it’s no way near as complex as the beauties of the natural world or even the hand that types this post on mobile. Our hands are amazing tools, yet some folks sadly doubt that they had a Maker!

As I pondered that fact, this verse came to mind.. may it bless your heart as it did mine. It's a prayer I often pray!


That they may see, and know, and consider, 
and understand together, 
that the hand of the Lord hath done this, 
and the Holy One of Israel hath created it. Isaiah 41:20

Thanks so much for popping over to this blog, especially as I’m time poor on mobile device, thus struggle to return your kindness.

Lord bless you, dear ones, in every way this day, you are so precious to me,

Prayer hugs, 🙏🤗

Shaz in Oz. Xx 

Joining up with following challenges: 

Word Art Wednesday - anything goes    http://wordartwednesday.blogspot.com.au  

Wednesday, 7 February 2018

WOYWW - Brayer Iridescent Medium + Brusho cards

WOW! yes another week gone .. and didn't excel in past week, missed a family birthday yesterday (oops!) so posted a belated one today.. better late than never! :D
And its Wednesday sooooooo time for WOYWW or What is On Your Workdesk Wednesday ... Pop over to Julia’s Stamping Ground! Check out desks all over the world! To my desk!
So on right is an engagement card on the make... all elements there but not assembled. The lily of valley flowers are Spellbinder, I bought die cuts on eBay in white and coloured them, had ten lily of valley, and ten blue bells cheaper than buying dies! but card wasn't grand to colour, a bit poor quality really. I'm a paper or cardstock snob, I think... to left of that is another card been sitting there almost done for ages now finished as birthday card for nephew 3, it will be late I think as is nephews 2, but not showing it. On very left are card inserts already printed out.
This was brayered and stamped (probably Archival Black) years ago.. a true snippet, as are the corners (a square die cut up), I used iridescent medium on the brayer gloss card base with Kaleidocolor pad in blues... or maybe Big & Juicy pad looking at edged in greens.. snippet used for greeting die cut.
IO greeting set, top edgers.
 
 Now these are three more of the ten cards made as "thank you cards set" .. a requested wedding present .. she likes blues and greens, I've been told - so used blue green brushos, on two of them - watercolour resist technique + die cuts on third (used a CCD, comes in two pieces, can be used as one or alter to size). EF is Embossalicious Swirl. CCD for first TY die, and for "thanks" is a CB Olivia alphabet set.
Now to my Aussie shot.. we sat watching the waves this afternoon on our icecream drive :D Am busy next two days, hope to catch up on commenting on Sat. all being well!
Oh, excitement - just discovered have a new encourager of this blog .. a big welcome to Laurie! of In My dream, I see! pop over and leave some love.. she's only a fairly new blogger from Ontario, Canada!
 Thanks so much for popping over for a peek, especially if you stay for a chat!
May God bless your day wherever you maybe!
Shaz in Oz.x


Thus saith the Lord God... ".. yea, they may forget, yet will I not forget thee.
Behold, I have graven thee upon the palms of my hands".... Isaiah 49: 15b, 16a

Joining up with following challenges:
Word Art Wednesday - anything goes    http://wordartwednesday.blogspot.com.au 
Stamping snesations - Anything with flowers! loads of flowers here! http://sirstampalotchallenge.blogspot.com.au/2018/02/february-anything-with-flowers.html 

Wednesday, 31 January 2018

WOYWW Ink Resist, Distress Inks water colours, et al

Hi there one and all. 
Mm, where did January go? Can’t believe it is the last day!!! And it is also Wednesday... so, time for WOYWW or What is On Your Workdesk Wednesday ... Pop over to Julia’s Stamping Ground! Check out desks all over the world! Warning though, it’s addictive! 
To my desk, or actually desk at my sister's home of last week! why I wasn't here in blogland.
Enjoying the beach, and we were colouring too with my sister’s Prismas... the crystal clear water was superb and so time was enjoyed, just chilling. No we haven’t finished yet, but I'm going to make mine up into cards...
Today's desk now has lots of cards, just finished the last of the ten cards I was making as a wedding gift. No, not made wedding card yet, need an engagement card too for another couple. Not due til third week in Feb.
I’ve had been trying out some new techniques which I’d saved in my “Must Try This!” page on Pinterest.  Mine, however invariably dont look like a CASE, at all.
 This one I will keep for me, its with different butterfly a magasine freebie, one below has Kaisercraftt butterfly, script stamp is SU French Script. Stamplorations set for greetings.
Didn't have right stamps or Distress Inks colours, however I was told bride likes blues, soft green and neutral shades so used those.
Loll's smooshing (see here) is nothing like mine. I couldn't get same intensity. 
Wondered if she used DI re-inkers?
Mine just "mooshed" not smooshed, very non-descript, not a true smoosh!!
 Very happy with these two, will keep top one, they were cased from Laurie's blog (see here) Again, not like but okay.. Used fern from discontinued set by Elusive images (pre-Chocolate Baroque). Used colours on Laurie's previous post but DI. Put down layer sponged layer of Antique Linen for background for ease of blending colours. Added Broken China and Cracked Pistachio in areas then blended with Antique Line again.
Thought I’d share this, about a die storage book, found on eBay, to hold the CCD or cheap China dies. Mine came quite quickly, in twelve days. (Link here to book, you can chose what size in pages you want, I went for three so some are large some are small sleeves for die.
Now to my Aussie shots..
 Yes, it was simply lovely going to swim at this spot, and not there weren’t lots of people there! Very very spoilt...
Very blessed of God to live in such a beautiful part of His creation. Very grateful!
Took few bird photos too. NOTE: all from inside house, so maximum zoom through windows. This is large dead tree in front centre. Two crested pigeons sitting in it.

These are two Masked Lapwing or hooded plovers, they seemed to be on  guard over the two new native banksia planted that morning by local dune patrol (family member + neighbour :D)
These are two Yellow Tailed Black Cockatoos, in same dead tree.
This is why is important to keep a dead tree roosting spot for all varieties.
I am very sorry, rather time poor at moment and trying to catch up on commenting.
 Thanks so much for popping over for a peek, especially if you stay for a chat!
May God bless your day wherever you maybe!
Shaz in Oz.x 
 Linking up to:
1. Word Art Wednesday - anything goes    http://wordartwednesday.blogspot.com.au 
3. http://pennyblackatallsorts.blogspot.com.au/2018/01/january-something-new.html 
* **Several new things, rectangle die, the butterfly stamp and fern stamp although very old never used before so real NBUS to quote Darnell. Plus both were new techniques to me!

Tuesday, 5 December 2017

Lawn Fawn Gleeful Gardens Stamp - Bizzy Bec’s DT

Hi there everyone, time for a DT post for Bizzy Bec's!
 And for the ANYTHING GOES DECEMBER CHALLENGE 
.. please do enter you might win that prize.
Today trying another new set of stamps, what fun! quick peek at one of cards here.

As A new set of stamps to me, so hunted out some cards made preciously with them for ideas, and then stamped out with Back Versafine ink and embossed lots of little images.
Ideas galore... use Pinterest for my ideas hunt.
Coloured the images up with Caran D'Ache watercolour pencils and used Tombow water based blender too.
Figuring out main card design here.
This card very appropriately is in France now, know the very special recipient has it already! :D All supplies listed below.

Made two bonus cards as spares the greetings are from the stamp set too!

 Items used:
Pre-order Spellbinder Pierced Rectangle

 Now don't forget to pop over  HERE at Bizzy Bec's and check out the other DT gorgeous creations, and please do join in the ANYTHING GOES August CHALLENGE - to win that prize.
Pop by Bec's store, too, for her great bargain prices


Thanks dear friends for popping over too and a very extra special thanks if you kindly take time to comment!
You are really appreciated!
May God bless you in everything wherever you maybe!
Shaz in Oz.x  

  Linking up to:
 1. Word Art Wednesday - anything goes, both cards   http://wordartwednesday.blogspot.com.au   
2. http://www.simonsaysstampblog.com/wednesdaychallenge/simon-says-anything-goes-44/
3. http://pennyblackatallsorts.blogspot.com.au/2017/12/december-cas.html  ("sorry I'm late" card, hope it is CAS enough? never quite sure on that.) 
4. Share as many projects as you like, as long as they are coloured by you!
 https://www.mycreativescoop.com/color-inspiration-monthly-link-29/ 
5. Anything Goes http://craftingfromtheheartchallengeblog.blogspot.com.au/2017/12/challenge-186.html

Thursday, 11 May 2017

Inspired By Stamping Guest DT - Double Emboss Vellum

{WOYWW post is below this please scroll down. Thank you.}

Hi there, everyone! I am so excited today... my very first post for Inspired by Stamping as their Guest Artist for this month of May.
 I really want to thank Joanna for the honour of being one of her Guest Artists, and for the pleasure of working with her beautiful images + great quality stamp sets.
  My card today uses a technique, new to me, that I’ve called “double embossed vellum”, using two of Joanna’s stamp sets – **Australian Nature 1 and **Fancy Labels 3 Stamp set.
Use heavy weight vellum and dust anti-static embossing powder tool over the vellum. Next is the Versamark inking and heat embossing, with Mini Misti. 
Ink & heat emboss the Fancy Labels 3 stamp set – using the label stamp first. 
With Misti, line up the accurate sentiment placement, inside the label.
From the same Labels set (it has two greetings, which fit in the lovely frame) chose the thanks verse for inside the frame, test right spot with Mini Misti first.
TIP: Ink stamp several times with Versamark on each of stamped image for clear impression -> add gold embossing powder -> heat emboss.
Use Tombow watercolour markers in soft green and lemon, alternating the shades, colour the diamond grid pattern on the lovely frame. With Ranger Multi-matte medium glue put dots on the back of vellum frame. Glue the stamped coloured frame to some scrap white card. This gives a base colour and firmness to the translucent vellum.
Lay the matching die over the image, attach with repositionable tape, die cut in Cuttlebug, through both the vellum and adhered backing cardstock.
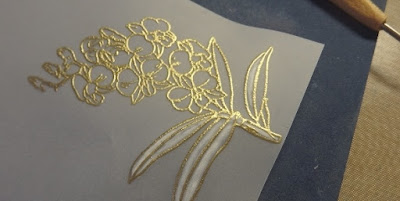
Next, after using anti static powder tool, stamp with versamark on same heavy weight vellum the Cooktown orchid image from the Australian Nature 1 set. Heat emboss with Gold Embossing powder.

I haven’t seen quite this way of double embossing that I can recall, but when I saw this image, I thought of doing this technique. I am using artistic license here, as the Australian Cooktown Orchid is a dendrobium variety which is actually purple-pink. However there is an Alba form of the dendrobium orchid, which is white with lime-green touches, so that’s what I chose.
Turning the vellum with orchid image over to the back, with embossing tool and mat start to shade in the flower image to give texture and dimension to the flower. I really do love my images to have texture and dimension.
Use both large and smaller ends of tool, with gentle, even pressure in circular motion to press vellum into image shape on shaping mat. Take care to stay within lines. Vellum looses its translucency with this pressure.
Because it is no longer translucent, the colouring will need to be done on the top. Use Tombow pens (olive green, soft green plus lemon) colour in areas of leaves and flower centres. Then with fine scissors, fussy cut the vellum with Alba form of dendrobium orchid. Take care to trim around outside of gold ink-embossed edge of image, use the ridge of heat embossing for your cutting guide.
I chose a soft green spot designer paper from one of Joanna’s lovely pads to match the colours, inked it around edges for highlight with ink and ink duster.
To assemble - add the frame and orchid in together, lining up for best balance on the frame. Attach the orchid image with 3D clear gel adhesive, as this gives great support. Attach the frame (and attached orchid) with mounting tape2, http://www.simonsaysstampblog.com/wednesdaychallenge/simon-says-going-dotty/, to the inked base of designer paper.
To finish off the card, simply add some of the very luscious ribbon with a bow from Joanna’s Vintage Floral collection. Ribbons match the pad perfectly; mount all this onto a base soft green cardstock from stash.
I have really enjoyed working with Joanna’s stamps. I’ve been stamping and embossing images since 1990, and these are really great, quality images - such a pleasure to use them. I really do hope this post has been helpful to some fellow crafters out there in blogland! Thanks so much for popping over, and please say hi to let me know you’ve been by!
Shaz in Oz.x 
PS would appreciate it very much if you have time to comment on the GDT post, please.. if able. Thank you.  https://joannamunster.com/2017/05/10/gdt-shaz-in-oz-double-embossed-vellum/
SUPPLIES USED:
Stamps & Die sets:
1. Inspired By Stamping Australian Nature Stamp Set
2. Inspired By Stamping Fancy Labels 3 Stamp set
3. Inspired By Stamping Fancy Labels 3 Dies
Embellishments:
Inspired By Stamping Vintage Floral Paper Pad
Inspired By Stamping Vintage Floral Ribbon Collection

Other Supplies: Embossing anti-static pad, Versamark ink pad, Ranger Gold Fine Embossing Powder, Heavy Weight Vellum, Mini Misti, Tombow Markers, Embossing tool + embossing mat, fine scissors, Cuttlebug, heavy weight 300gsm cardstock for card base. Inkylicious Ink dusters, Memento Bamboo Leaves- small ink pad. Double sided mounting tape, Ranger Multi Matte Medium glue, 3D clear Gel adhesive (under the Vellum 3D orchid flower.)

"But mine eyes are unto thee, O God the Lord: in thee is my trust;.." Psalm 141:8

Linking card over to:
1. Word Art Wednesday - anything goes  http://wordartwednesday.blogspot.com.au/
2. Simon Says Monday challenge "Its a Frame Up" - http://www.simonsaysstampblog.com/mondaychallenge/?p=8961 

Wednesday, 26 April 2017

ANZAC + WOYWW + Scrappy Mo's Christmas Challenge

hi there one and all, a very quick post today.. as yesterday was ANZAC Day (Australia New Zealand Army Corps) here and in NZ, I thought i would share a photo of four paintings by Thomas (7) and Emily (5). I was really impressed with them, but maybe a tad biased.
ANZAC Day is from WW1 In 1915 on Sunday, 25th April the Australia New Zealand Army Corps landed in Gallipoli, Turkey. Here we achieved nationhood in bloodbath of fighting, the like of which has never been forgotten by both nations.
Lest we forget. Ever so grateful for all brave ones who fight for nations freedom.
Okay, everyone .. as it after 25th, we know that means Rudolph day! so here I am this morning going through my pre-prepared stash of Christmas items. Cards images from last year, background and sentiments done to chose just what!!?? I was going to make. on left is almost finished card with brusho resit tag on it. Aimed to print out some Romanian greetings for it.. which you can see below too add to it.
I hope to make a dozen cards for missionary in Romania. She told me what Bible text they use and said of the greeting which I sent her suited. I researched some Romanian embroidery images as thought the ladies might like these. added greetings to them and will die cut them all.
This was piece I decided to go with (made last year), + one of the print out of Bible verses on desk also.Made with CB large EF from Winter Wonderland set, added to top of folder Versamark then clear embossed and heat set.Used Watercolour paper, and sprinkled brushos over it Cobalt and Rose Red).

Didn't add much, verse is by Karen of WAW, bought from her on Etsy. The Snowflakes from RosA (thank YOU!) and Memory Box I think.Sliver thread on bottom, the piece was given to me, ages ag- finally made it to a card.
Now to the Aussie photos -
Eastern Yellow Robin
at Campsite at Scotts Head last month.
Gold Coast, Qld. from highest tower, Q2. Cant get over how it has grown from when we went there when young, too big for my liking now.
Taken this evening on my walk - I wish you could've been there! Too many to share now, so much beauty of God's creation. Truly "the heavens declare the glory of God".. Psalm 19:1

May God bless your day everyone.. where every you maybe, and thanks so much for popping over for a peek and chat, you really do cheer my heart!
Shaz in Oz.x
 Verse of day is in honour of those who gave their all for us:
 "Greater love hath no man than this, that a man lay down his life for his friends. John 15:13

Joining up with: 
1. Word Art Wednesday - anything goes  http://wordartwednesday.blogspot.com.au/ 
2.  Rudolph day challenge over at Scrappy Mo's

Related Posts Plugin for WordPress, Blogger...