Thank you for taking time to visit, and I hope I am even a tiny bit helpful as I have been helped and blessed by so many others. I have been doing Calligraphy since teens, and card making for many years as well. In 1990 I delighted in the joys of stamping with ink and embossing after a trip to Cairns, Qld. In 2009 I discovered the brayer, 2010 the Cuttlebug, also have now taking to reading up on crafting blogs and lo! Here I am, on one of my own.

I live on the coast of eastern Australia. I am a Christian. I trusted in the LORD down here at the beach, amazingly it is not far from where I now live. It was over 50 years ago, after a Beach Mission Service at the age of 12 years

Showing posts with label 3D pictures. Show all posts

Sunday, 19 November 2017

Blogger Tips on How to build a successful Blog

(Promised this ages ago, if looking for Beccy's challenge, et al. please scroll down, not far!)
 
I started blogging by accident in November 2010 (01.11.10), for my first post see here, I did eight months of blogging before jumping in so had some idea already. 
 Decide which format or platform you want to use, most crafters use Blogger and so I chose that over Wordpress, the other popular platform.
1. First of all -Name of blog.
Make it uniquely yours! Easily identified, see mine above .. it is easily identified, not generic name.
Also if possible have same URL as blog it’s very helpful!

this is mine, for Google search ease.
https://calligraphycards-shazinoz.blogspot.com.au/
If you change your mind later on blog name, it won’t be same URL, hinders google analytic searches.

2.  Search engine accessible.
 Travelling around blogland these days, a lot of folk don't make the best use of how search engines work!! Using this knowledge in post titles they publish.  
Key to being picked up in search engine searches is a good post title.
Look at this post title!
Blogger Tips on How to Build a Successful Blog
***First of all I do have a title. 
Some folks dont even realise they need a post title.
No post title means every single post you write on your blog will have the same URL.

This will be come a problem if you want to join challenges, link over somewhere or send a link to someone for specific post. 
**Give your post a GOOD title.
It is best not to use simply one word. eg birthday, it simply wont come up in any search, too generic.
THINK, ASK:  What might a search engine look for?

Or what might be put in a Google search? 
Tips for blog post title:
A. Name of technique used or explored. 
eg Wet and Dry Embossing on Christmas cards.
B. Name of key product used.
 eg Lawn Fawn Gleeful Gardens stamp set - in 3D style 
I think about what question I would put into a search engine when writing a blog title.

3. Blogging Etiquette - As much as able return visits, and if someone joins your blog don’t ignore them, welcome them and join theirs... if you can find who they are.
 If you join someone’s let them know so they don’t have to hunt for you too.
Simple Blogging courtesy is the key.

4. Images: Use good clear images with simple, clear explanations ...avoid waffle. I’m going to talk in another post about images, photography tips, because image size is relevant. 
(Am writing a post on how to take good photos so watch out for that one)

5. Blogger Tools - Do Use Them.
Use labels on your sidebar and key labels as top tabs in pages on layout.

As you'll see I've several top tabs. Home, Calligraphy, Christian, Tips Techniques,  etc. Labels are handy for quick searches. 
Mine actually need a good spring clean.
Use blogger Gadgets and Widgets (in layout on Blogger) to add a Search bar, Follow by Email etc.

6. Open any link on post in NEW tab... please, please don’t take folk away from your blog by not doing this simple thing, ie a link opens in a new tab, not on page you’re currently viewing.
Blog Post explaining this - see here!

  These are just a few helpful tips. There is much more could share as now been blogging for over seven years, but won’t take up any more time.

Just adding quickly to this ready post my challenge entry for Beccy's great blog sketch challenge. . here! My take on it below using one of Beccy's gorgeous nativity digital images, a pre-coloured one! 
Not quite happy with it, but one more made! Yay!
 Beccy's pre-coloured shepherd image, ink dusted the background did mask iamge but imperfect masking -> so hand cut another to over lay image, in my easy 3D style (see here), ta-dah! my take on her sketch, no altogether happy but it will do.
Enjoying beautiful weather down under .. a favourite beach north of here!

Thanks to all my wonderful encouragers on my blog, I feel very unworthy of all you kind folk who’ve joined and keep coming back even when I can’t visit as much as I have in past.
Do pray this post is a help,  will blog photo post soon, God willing. Promised someone these ages ago. 
Prayer Hugs, 
Shaz in Oz.x

"Now unto him that is able to do exceeding abundantly above all that we ask or think, according to the power that worketh in us, unto Him be glory..".. Ephesians 4:19, 20a


I would like to link these up to the following challenges: 

Sunday, 15 October 2017

Bizzy Bec's DT - Side Step card With 3D Images

Hullo there everyone .. back again with another DT post for Bizzy Bec's. Branching out into the unknown today, with a side step card!! For a very special birthday, you see! Emily was SIX! Here is a peek!
I'll be perfectly honest I like simple layouts and these fancy folds are not simple layouts!! Bec has a great die that makes variations on this side stepping card, it is here! Don't have it, but do have simple template. Used it for guide. Here working it out on my scoreboard. Took two goes scoring to get it right.. wanted it bigger than template.
And being me, I went for complex everything else too! I used the Frantic Stamper Dies - Chevron Borders & Edgers (2) to make a whole sheet for background of alternating chevrons! Glued them down one at time, kept them in order as cut the individual ones, so as to keep *colour graduations, yes fiddly plus but great effect. *used pre-coloured sheet.
Base for image done, then cut it with largest die of SB Pierced Rectangles

Stamped two images (one for base, one for 3D image) of the Wild Rose Stamps - Dragon Birthday in Versafine Black Onyx, and clear heat embossed.
Die cut a pink scalloped base with Spellbinder Petite scallop (Disc.) and one image with Cottage Cutz Stitched Oval die (they fit spellbinder oval dies very well).
While still in stitched die, ink coloured the background to match colours used on other image already coloured with Tombow markers, and gold watercolour. Fussy cut around the coloured dragon image, cutting into the folds of the image, and then lay on shaping mat face down, shaped the image  with shaping tool to get 3D effect with minimal layers.
Attached to base image with silicon glue and allow to dry.
See here for Tutorial to do it this way.

Completed side step card:
(candle stamp on side step is from House House Birthdays Balloon stamp set, they were shaped and silicone glued too).
Six 6 is from CB Olivia die set, "th"
is from Impression Obsession Greetings die from birthday - this set here!

**Wild Rose Stamps - Dragon Birthday 
(**bought Aug '17 from Bec, still available online, but not listed, so please ask for it)
Tombow coloured pens 
Close up of the image, the gold paint used is Finetec Watercolour metallic set. Just loved this image, right down to wee crown on Miss Mousey's head.
This rather poor verse below is what was put on the back of the card, digital print out, on DP, cake image courtesy of Google.!
Now to the  Aussie shot .. a very clever photographer in our family, Greg, took this from their verandah.. amazing sky and reflections too, isn't it .... truly the sky shows the glory of God as the Psalmist says.

"The heavens declare the glory of God; the firmament shows His handiwork." Psalm 19:1

And dont forget to pop over  HERE at Bizzy Bec's and please do join in ANYTHING GOES September CHALLENGE - to win that monthly prize (posted overseas too!).
Pop by Bec's store, too, for her great bargain prices
.


 Thanks so much every one for popping over for a peek and chat!
May God bless your day wherever you may be. 
  Will do my very best in commenting, and truly appreciate your visits!


Shaz in Oz.x 
  Linking up to:
 1. Word Art Wednesday - anything goes, both cards   http://wordartwednesday.blogspot.com.au   
2. Di's Snippety challenge - Used snippets, die cuts, and stamped images, too.  http://pixiescraftyworkshop.blogspot.com.au/
4. Simon Says Wednesday challenge - cheer someone up with a card.

Friday, 15 September 2017

Bizzy Becs DT post - Watercolouring with Distress Inks.

 (WOYWW Post below this)

Hi there everyone, Am here with a another DT post for Bizzy Bec's - this time tutorial - watercolouring with distress inks.
Although this image came coloured I wanted to colour it. This I found was best way to colour any fine lined image, as no detail is lost! Plus Distress inks blend beautifully.
Smooched 
Distress ink on white piece of laminated cardstock, or use a stamping block, with white paper under it so you can see colours.
Used two mauve/ purple, and three green with blue. DI Blue Denim was used on both purple and green for shadows.
So here is the completed image .. this was for a very special ladies birthday. I inked whilst the die cut still in Stitched Oval die with Distress inks in two greens, Peeled Paint, and Pine Needles. Cottage Cutz Stitched ovals  fit really well the largest of the Spellbinder Elegant Ovals.
I shaped the flowers as love the 3D look, although it doesn't really show that clearly - see here to show I do it. I did this with a single coloured layer.. a cheat's way :D
Completed card. All dies, etc, used listed below. Although looks like 80 is in different coloured mirri card it is not :D
Items Used:
 Spellbinder Elegant Ovals
Our Daily Bread Beautiful Border Dies.
(Available previously with Bec before, so check availability).
Dies on Small labels:
Greeting is a disc. Our Daily Bread Greeting set, and Cuttlebug disc. Olivia Alphabet set for numbers. 
The digi image is Beccy's place Iris digi http://beccysplace.com/iris-garden-digital-stamps/

 Now don't forget to pop over  HERE at Bizzy Bec's and check out the other DT gorgeous creations, and please do join in ANYTHING GOES September CHALLENGE - to win that prize.
Pop by Bec's store, too, for her great bargain prices
.
 
 
Photo taken by Fraser Young in South Australia.
.. oh we need some rain in our part of Oz, they've had rain down there - we have not. Love this shot .. the clouds and sheep are a real contrast.
An image which brings a smile to my face, as does this card (so linking up with
*Annie's Friday Smiles) .. if you want to see the cards I made for Nan as well as this one , just scroll down!


Thanks so much every one for popping over for a peek and chat!   
May God bless your day wherever you may be. 
Also wish to apologise for tardiness in commenting, very busy here downunder :D
 

Shaz in Oz.x

"O give thanks unto the Lord; for He is good: because His mercy endureth for ever."
Psalm 118:1

Joining up with the following Challenges:
 1. Word Art Wednesday - anything goes 
2. Tic tac toe at Flower challenge Using diagonal, white, watercolour, sentiment. 
(Mm, just realised my card has all but two (blue and CAS) of tic tac toe, so could go many ways!)
3. http://beccysplace.blogspot.com.au/2017/09/september-challenge.html
4. http://sirstampalotchallenge.blogspot.com.au/2017/09/september-photo-inspiration.html
At Stamping Sensations they've a colour challenge, can use one or more colours or just the flower  which I've done.
Stamping element is the gold embossed greeting.

Thursday, 25 May 2017

How to Die Cut Outside an Image - 3D Stamping - Inspired by Stamping GDT

{for WOYWW 8 post, please scroll down, or Click Here thank you.😊}

Hi there, everyone - here I am honoured indeed to be back with my second GDT for Inspired By Stamping for May!
Had such great fun making this card, using two of Joanna's gorgeous stamp sets - Australian Nature 1 and Just for You.
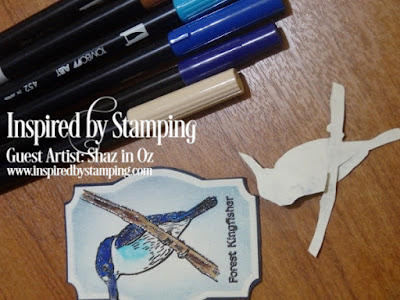
Started by stamping the stunning forest kingfisher. You don't see them around here in NSW but in far north Qld.
Used black onyx Versafine on small piece of natural parchment cardstock, its a good paper to colour. I'm an old fashioned stamper, I learnt stamping with embossing, so that's what I nearly always do. Stamped two as going to 3D the image. Do love dimension on a card.
TIP: How to cut outside an image with a die
On the base piece I cut around the tip part of the beak on the bird to lift it over edge of Fancy Labels 3 Die . For further posts on how to cut outside an image with die cut see here. 

This means it won't be cut through when you run it through the Cuttlebug. As 3D would overlay it, didn't really need to do this - but it does mean beak tip has extra strength of double layer. You can see how I cut it on the back of die cut. I just add tape on back these cuts, so as to keep it unnoticeable.
 Checked out online colours of Forest Kingfisher before colouring. With its proper name under it, I had to get it right, plus it was a card for a birdlover.
Next shaded around the die cut whilst still in die, with brushes and Distress inks (Tumbled Glass, Stormy Sky).
  
Tested selected colours of Tombow pens on base image, before colouring second image.
Cut carefully around external and internal lines of second image, with fine scissors, use embossed edges as a guide.
**If you cut into sections of the image when layering, you can get away with just one extra image for 3D work, but most folks I know do up to four stamped images for layering.
This is the lazy (easier) way + less bulk and weight! 😉
**Shape the image with shaping tools on foam shaping mat.
**Adhere 3D image with dots of 3D silicone adhesive. Put aside to dry.
Next ink well top half of embossing folder (Sue Wilson Pinpoint 5.75" x 7.5" Embossing Folder - Ocean Waves) with Memento inks, Bahama blue, Teal Zeal, Paris Dusk, as this bird is often seen beside rainforest streams thought water EF was suitable. Sprayed it also with Imagine Crafts Frosted Sheer Shimmer Mist.
Inked in Mini Misti the greeting which matches "Just for you" "...on your birthday". Used Cobalt Versafine for this + the Just for You Greeting, heat embossed with clear Embossing powder.
Used Fiskars medium round corner punch on corner of embossing folder piece, edged it in navy card, and around the Fancy Labels 3 diecut. Popped it up on foam tape and attached to left of pre-stamped in Cobalt Versafine ink greeting. Hand cut a flag shape for the ".. On Your Birthday".
 
The dimension on the image can be seen with this shot. Even though there is some dimension, it's still a standard card here, weight + thickness pass for regular post. The 3D glue gives image extra support.
Hope you enjoyed seeing how this card was made. I loved it, and thoroughly enjoyed working with Joanna's high quality, clear stamp sets and dies. I really want to thank her very much for the honour of being one of her monthly Guest Design Artists.
Thanks so much for popping over and please say hi so I know you've been by,
Shaz in Oz.x

PS would appreciate it very much, if you are able to comment on the GDT post, please.. time permitting. Thank you.  https://joannamunster.com/blog-2/

SUPPLIES USED:
1. Inspired By Stamping Australian Nature 1 Stamps.
2. Inspired By Stamping Just for You Stamps
3. Inspired By Stamping Fancy Labels 3 Die .
Other Supplies:
Versafine Inks – Black Onyx and Cobalt, Clear Embossing Powder, Embossing anti-static pad. Regal Natural Parchment Cardstock, lightweight 170gsm for die cut + heavy weight 300gsm for card base.
Mini Misti, Tombow Markers, Embossing tools + foam embossing mat, fine scissors, Cuttlebug.
Inkylicious Ink dusters, Distress Inks (Tumbled Glass, Stormy Sky), Memento inks -Bahama Blue, Teal Zeal, Paris Dusk, Imagine Crafts Frosted Sheer Shimmer Mist, Sue Wilson Pinpoint 5.75" x 7.5" Embossing Folder - Ocean Waves, Fiskars medium round corner punch.
Double sided mounting tape, Ranger Multi Matte Medium glue, 3D clear Gel adhesive.

Linking card over to:

1. Word Art Wednesday - anything goes  http://wordartwednesday.blogspot.com.au/


Thursday, 11 May 2017

Inspired By Stamping Guest DT - Double Emboss Vellum

{WOYWW post is below this please scroll down. Thank you.}

Hi there, everyone! I am so excited today... my very first post for Inspired by Stamping as their Guest Artist for this month of May.
 I really want to thank Joanna for the honour of being one of her Guest Artists, and for the pleasure of working with her beautiful images + great quality stamp sets.
  My card today uses a technique, new to me, that I’ve called “double embossed vellum”, using two of Joanna’s stamp sets – **Australian Nature 1 and **Fancy Labels 3 Stamp set.
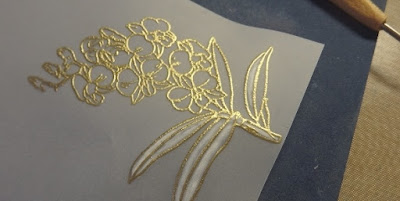
Use heavy weight vellum and dust anti-static embossing powder tool over the vellum. Next is the Versamark inking and heat embossing, with Mini Misti. 
Ink & heat emboss the Fancy Labels 3 stamp set – using the label stamp first. 
With Misti, line up the accurate sentiment placement, inside the label.
From the same Labels set (it has two greetings, which fit in the lovely frame) chose the thanks verse for inside the frame, test right spot with Mini Misti first.
TIP: Ink stamp several times with Versamark on each of stamped image for clear impression -> add gold embossing powder -> heat emboss.
Use Tombow watercolour markers in soft green and lemon, alternating the shades, colour the diamond grid pattern on the lovely frame. With Ranger Multi-matte medium glue put dots on the back of vellum frame. Glue the stamped coloured frame to some scrap white card. This gives a base colour and firmness to the translucent vellum.
Lay the matching die over the image, attach with repositionable tape, die cut in Cuttlebug, through both the vellum and adhered backing cardstock.
Next, after using anti static powder tool, stamp with versamark on same heavy weight vellum the Cooktown orchid image from the Australian Nature 1 set. Heat emboss with Gold Embossing powder.

I haven’t seen quite this way of double embossing that I can recall, but when I saw this image, I thought of doing this technique. I am using artistic license here, as the Australian Cooktown Orchid is a dendrobium variety which is actually purple-pink. However there is an Alba form of the dendrobium orchid, which is white with lime-green touches, so that’s what I chose.
Turning the vellum with orchid image over to the back, with embossing tool and mat start to shade in the flower image to give texture and dimension to the flower. I really do love my images to have texture and dimension.
Use both large and smaller ends of tool, with gentle, even pressure in circular motion to press vellum into image shape on shaping mat. Take care to stay within lines. Vellum looses its translucency with this pressure.
Because it is no longer translucent, the colouring will need to be done on the top. Use Tombow pens (olive green, soft green plus lemon) colour in areas of leaves and flower centres. Then with fine scissors, fussy cut the vellum with Alba form of dendrobium orchid. Take care to trim around outside of gold ink-embossed edge of image, use the ridge of heat embossing for your cutting guide.
I chose a soft green spot designer paper from one of Joanna’s lovely pads to match the colours, inked it around edges for highlight with ink and ink duster.
To assemble - add the frame and orchid in together, lining up for best balance on the frame. Attach the orchid image with 3D clear gel adhesive, as this gives great support. Attach the frame (and attached orchid) with mounting tape2, http://www.simonsaysstampblog.com/wednesdaychallenge/simon-says-going-dotty/, to the inked base of designer paper.
To finish off the card, simply add some of the very luscious ribbon with a bow from Joanna’s Vintage Floral collection. Ribbons match the pad perfectly; mount all this onto a base soft green cardstock from stash.
I have really enjoyed working with Joanna’s stamps. I’ve been stamping and embossing images since 1990, and these are really great, quality images - such a pleasure to use them. I really do hope this post has been helpful to some fellow crafters out there in blogland! Thanks so much for popping over, and please say hi to let me know you’ve been by!
Shaz in Oz.x 
PS would appreciate it very much if you have time to comment on the GDT post, please.. if able. Thank you.  https://joannamunster.com/2017/05/10/gdt-shaz-in-oz-double-embossed-vellum/
SUPPLIES USED:
Stamps & Die sets:
1. Inspired By Stamping Australian Nature Stamp Set
2. Inspired By Stamping Fancy Labels 3 Stamp set
3. Inspired By Stamping Fancy Labels 3 Dies
Embellishments:
Inspired By Stamping Vintage Floral Paper Pad
Inspired By Stamping Vintage Floral Ribbon Collection

Other Supplies: Embossing anti-static pad, Versamark ink pad, Ranger Gold Fine Embossing Powder, Heavy Weight Vellum, Mini Misti, Tombow Markers, Embossing tool + embossing mat, fine scissors, Cuttlebug, heavy weight 300gsm cardstock for card base. Inkylicious Ink dusters, Memento Bamboo Leaves- small ink pad. Double sided mounting tape, Ranger Multi Matte Medium glue, 3D clear Gel adhesive (under the Vellum 3D orchid flower.)

"But mine eyes are unto thee, O God the Lord: in thee is my trust;.." Psalm 141:8

Linking card over to:
1. Word Art Wednesday - anything goes  http://wordartwednesday.blogspot.com.au/
2. Simon Says Monday challenge "Its a Frame Up" - http://www.simonsaysstampblog.com/mondaychallenge/?p=8961 
Related Posts Plugin for WordPress, Blogger...