Thank you for taking time to visit, and I hope I am even a tiny bit helpful as I have been helped and blessed by so many others. I have been doing Calligraphy since teens, and card making for many years as well. In 1990 I delighted in the joys of stamping with ink and embossing after a trip to Cairns, Qld. In 2009 I discovered the brayer, 2010 the Cuttlebug, also have now taking to reading up on crafting blogs and lo! Here I am, on one of my own.

I live on the coast of eastern Australia. I am a Christian. I trusted in the LORD down here at the beach, amazingly it is not far from where I now live. It was over 50 years ago, after a Beach Mission Service at the age of 12 years

Wednesday, 31 May 2017

Christmas Challenge, WOYWW, Oxides + Romanian cards etc.

WARNING.. total photo overload today... :D
Hi there one and all.. yes another week has flown since posting! Think we all feel that time is simply scooting by! Time for another of Mo's Rudolph day, in fact it is over soon, at end of May in Canadian time! Also another WOYWW or What's On Your Workdesk Wednesday - pop over to Julia's blog, please say hi! Look, see, what you learn!
My desk today.
 Mid card photo, second last Romanian one, adding digi to background from paint clean up on home made gelli pad, see top post of my sidebar if interested in recipe, tried and true over generations of use. adding a digi with Romanian bible verse overlaid on it. Finished card, but not photographed.
My desk a few days back making background for stamping with Prickly Pear EEO145 nativty scene Verse is from Our Daily Bread Christmas set. My card for Mo's challenge, using my two Oxides, and some other inks as well to deepen Blue Jeans and Wilted Violet. BTW I think I've thought of an idea how to make normal DI into similar ways of layering as oxides. want more oxides but not pennies (due to expensive teeth) so thought of idea last night yet to try it. Watch this space.
Here you can see the faint outline of a CCD. This was lying on my desk, hadn't thought of it till my eye lay upon it.. Mm, I think that would work! this die is a detailed die. Put double side paper on back for easy adhesion, so it required multiple passes and shifting around. I lightly embossed it on inked sheet to get outline so as to make laying down very easy.
Plus slight embossing means it sits really well, giving sort of inlaid look..
Completed card.
Folder used is Ultimate crafts,
Christmas tradition 5 x 7 folder, extended a little.
ATC + Card - by SANDRA DE (link here)
Last week, we had out 8th WOYWW, I sent out four, two were in Oz and two were in UK. This lovely set is from Sandra De with one of her lovely watercolours on the card. I love the sheen on her ATC but doesn't really show up with all its nuances like the real thing.
 Romanian Birthday card, with brushos tag. Circle Die is a CCD, stamp is long discontinued SU one, On the Spot Background, plus Spots CB folder.
 God bless you in Romanian. Romanian embroidery digi from Google, gold braid from Shazsilverwolf. Embossalicious swirls folder.
 Digi from FB group, and Ginny Maxam, verse is 2 Chron 20:12.." for we have no might against this great company that cometh against us; neither know we what to do: but our eyes are upon thee."
Kaisercraft folder inked up in two greens of Brilliance inks over gold card base. God bless you, free doggie digi on B.'s Floral Fantasy blog years ago now...
Aussie shot .. sunset taken a while back.. stunning changes this evening like you rarely see. Love talking with God at such times. He is always near but especially walking in evening.

May God bless your day .. where every you maybe, and thanks so much for popping over for a peek and chat, you really do cheer my heart!
Shaz in Oz.x
" .. for we have no might against this .... that cometh against us; neither know we what to do: but our eyes are upon Thee." 2 Chronicles 20:12..
Linking card over to:

1. Word Art Wednesday - anything goes  http://wordartwednesday.blogspot.com.au/ 
2. Dis snippet's Challenge week 283/4 Used some sort of snippets on every single card.
5. Cuttlebug Mania - Frame it. Second Romanian rose framed card Plus Christmas leaf framed card

Thursday, 25 May 2017

How to Die Cut Outside an Image - 3D Stamping - Inspired by Stamping GDT

{for WOYWW 8 post, please scroll down, or Click Here thank you.😊}

Hi there, everyone - here I am honoured indeed to be back with my second GDT for Inspired By Stamping for May!
Had such great fun making this card, using two of Joanna's gorgeous stamp sets - Australian Nature 1 and Just for You.
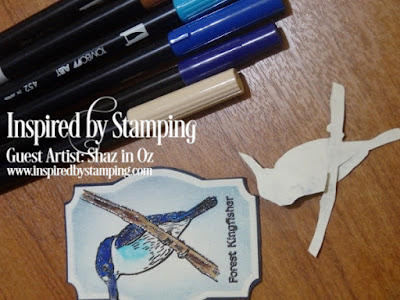
Started by stamping the stunning forest kingfisher. You don't see them around here in NSW but in far north Qld.
Used black onyx Versafine on small piece of natural parchment cardstock, its a good paper to colour. I'm an old fashioned stamper, I learnt stamping with embossing, so that's what I nearly always do. Stamped two as going to 3D the image. Do love dimension on a card.
TIP: How to cut outside an image with a die
On the base piece I cut around the tip part of the beak on the bird to lift it over edge of Fancy Labels 3 Die . For further posts on how to cut outside an image with die cut see here. 

This means it won't be cut through when you run it through the Cuttlebug. As 3D would overlay it, didn't really need to do this - but it does mean beak tip has extra strength of double layer. You can see how I cut it on the back of die cut. I just add tape on back these cuts, so as to keep it unnoticeable.
 Checked out online colours of Forest Kingfisher before colouring. With its proper name under it, I had to get it right, plus it was a card for a birdlover.
Next shaded around the die cut whilst still in die, with brushes and Distress inks (Tumbled Glass, Stormy Sky).
  
Tested selected colours of Tombow pens on base image, before colouring second image.
Cut carefully around external and internal lines of second image, with fine scissors, use embossed edges as a guide.
**If you cut into sections of the image when layering, you can get away with just one extra image for 3D work, but most folks I know do up to four stamped images for layering.
This is the lazy (easier) way + less bulk and weight! 😉
**Shape the image with shaping tools on foam shaping mat.
**Adhere 3D image with dots of 3D silicone adhesive. Put aside to dry.
Next ink well top half of embossing folder (Sue Wilson Pinpoint 5.75" x 7.5" Embossing Folder - Ocean Waves) with Memento inks, Bahama blue, Teal Zeal, Paris Dusk, as this bird is often seen beside rainforest streams thought water EF was suitable. Sprayed it also with Imagine Crafts Frosted Sheer Shimmer Mist.
Inked in Mini Misti the greeting which matches "Just for you" "...on your birthday". Used Cobalt Versafine for this + the Just for You Greeting, heat embossed with clear Embossing powder.
Used Fiskars medium round corner punch on corner of embossing folder piece, edged it in navy card, and around the Fancy Labels 3 diecut. Popped it up on foam tape and attached to left of pre-stamped in Cobalt Versafine ink greeting. Hand cut a flag shape for the ".. On Your Birthday".
 
The dimension on the image can be seen with this shot. Even though there is some dimension, it's still a standard card here, weight + thickness pass for regular post. The 3D glue gives image extra support.
Hope you enjoyed seeing how this card was made. I loved it, and thoroughly enjoyed working with Joanna's high quality, clear stamp sets and dies. I really want to thank her very much for the honour of being one of her monthly Guest Design Artists.
Thanks so much for popping over and please say hi so I know you've been by,
Shaz in Oz.x

PS would appreciate it very much, if you are able to comment on the GDT post, please.. time permitting. Thank you.  https://joannamunster.com/blog-2/

SUPPLIES USED:
1. Inspired By Stamping Australian Nature 1 Stamps.
2. Inspired By Stamping Just for You Stamps
3. Inspired By Stamping Fancy Labels 3 Die .
Other Supplies:
Versafine Inks – Black Onyx and Cobalt, Clear Embossing Powder, Embossing anti-static pad. Regal Natural Parchment Cardstock, lightweight 170gsm for die cut + heavy weight 300gsm for card base.
Mini Misti, Tombow Markers, Embossing tools + foam embossing mat, fine scissors, Cuttlebug.
Inkylicious Ink dusters, Distress Inks (Tumbled Glass, Stormy Sky), Memento inks -Bahama Blue, Teal Zeal, Paris Dusk, Imagine Crafts Frosted Sheer Shimmer Mist, Sue Wilson Pinpoint 5.75" x 7.5" Embossing Folder - Ocean Waves, Fiskars medium round corner punch.
Double sided mounting tape, Ranger Multi Matte Medium glue, 3D clear Gel adhesive.

Linking card over to:

1. Word Art Wednesday - anything goes  http://wordartwednesday.blogspot.com.au/


Wednesday, 24 May 2017

WOYWW 416 = 8 years today + Romanian Cards etc.

{Special thoughts and prayers for Manchester. 🙏🏻 ❤️
  I have family who live there .. they were away from town at time mercifully, but I have been praying for all who have suffered through this cruel, senseless act.}   
 Hi everyone, as the days are rushing past in May.... and it's WOYWW 8
- aka 416th week of WOYWW!!!

 Boy, is that a lot of weeks.Was 8 months late starting for WOYWW, (as before I blogged) + other reasons I've managed *208 of them!!
(**EDIT: used numbering labels on my blog sidebar - I didn't actually count them!)

This is a wee homage to WOYWW, these items are always on my desk someplace, the first item is the PiF of my first WOYWW anniversary in 2011, made by a very dear friend and clever one too, Jozarty. It has many exquisite elements on it, including an enameled WOYWW key chain. I have two ATCs made by Jo (aka Twiglet) and as they're dumfing (which is my utter fav. technique) they're usually on my desk someplace + my usual WOYWW sign + two rascally monkeys, one wearing the WOYWW badge. I took that badge all way on visit to UK, then forgot to take it on the day I was meeting WOYWWers in Manchester - Neet, Jozarty, Donna Doone, and Anne :D
Desk this morning.. mid stream on number of things .. as it is now after 7pm this was hours ago. I have finished the two cards and will share. (I am struggling a little to keep up with things at the moment.. for several reasons mainly family commitments-> tiredness from this. However, I love helping my family and wouldn't swap, they're priority. But it means for last ten months I  have struggled to keep up commenting, so am bad blogger in reciprocating. I am sorry.)
Am making the Romanian cards, still, making 12 for a missionary in Romania. Loved the effect of the inking of embossed sheets here .. great fun!
Inking up embossing folder Sue Wilson Pinpoint Embossing folder Ocean waves. Love size of this ... its 5.5" x &.5" from memory, but being bigger than 5 x 7" you can emboss the whole front of a 5 x 7 card, which you cant with most 5 x 7'', so annoying.
Black card stock, embossed added inks shown, mostly the Oplalite with touches of Sky Blue Brilliance.
Completed card. I did google search for bible verses they use. Copied and pasted these into word doc. overlaying it on image.
La Mulți Ani! = happy birthday etc.

The painting is a famous Romanian one according to Google. ;) amazing sheen on this ..
Psalm 34:6: 
This poor man cried, and the Lord heard him, and saved him out of all his troubles.
Embossalicious Folder swirls, with ribbon die by Nellie Snellen on side of ribbon, Scallop Labels Spellbinder, you cant see it but image is sprayed with Frost shimmer mist.. love sheen and sparkle!
Verse Proverbs 3:5 "Trust in the LORD with all thine heart, lean not to thine own understanding."
Embossalicious sswirls again, blue card with Blue Opalite,  lace + pearls across bottom, printed verse on a frame (+one above) from Ginny Maxam of Maxam Made.
Verse is Psalm 46:10 "Be still and know that I am God."
Last week I picked the home grown pineapple ... see below - we cut it up, weighed (365g, not skin etc) and wow, might not be biggest BUT was it the sweetest pineapple ever!! sorry none left :D
Today we went for a drive, about twenty mins south. .. it was one glorious day the LORD gave us .. 28c and sat eating icecreams (Weiss Mango Macadamia - YUM!) in car and balmy 28c enjoying fresh summer-like air from open car windows. This is second view and one below is first stop.
Happy WOYWW8, everyone
If you pop back in twelve hours time, I am posting a second GDT card, as this month's Guest artist for "Inspired by Stamping"..
May God bless your day .. where every you maybe, and thanks so much for popping over for a peek and chat, you really do cheer my heart!
Shaz in Oz.x
Linking card over to:
1. Word Art Wednesday - anything goes  http://wordartwednesday.blogspot.com.au/ 
2. Simon Says Wednesday challenge - a little bit of Sparkle - second card- shimmer sparkle of frosted shimmer spray on iamge and also flower, was coloured and sprayed with mist too.
3.Allsorts Challenge Blog - Birthday - the second card is a birthday card.


Wednesday, 17 May 2017

WOYWW, Vellum Stamping +Pineapple Picking!

Hi everyone, as the days are rushing past in May.... 'tis Wednesday, again!
Here's my desky share for WOYWW or What is on your Workdesk Wednesday (over here at Julia's and please do join in, too!).
Two current desks to see today!!
Desk 1: More Romanian card work, made a little headway and made two of the dozen, then to right are the left over images, some with Romanian Bible verses on them and some print out of verses and greetings. I hope to have them done by end of week!
Mm, am realising this time next week I need an ATC or two made for then.
No inspiration yet but will come!! Can't rush these things. ;)
This is in centre of desk above (the scroll on right was a newly arrived CCD, took 47 days to get here! a record!). In choosing verses, I've picked ones that suit if one  knows the LORD and also those who do not. This one from Proverbs 3:5 "Trust in the Lord with all thine heart, and lean not to thine own understanding."  I was surprised at how long the name for Proverbs was, and mentions Solomon in it, he wrote most of Proverbs but not all of it.
Desk 2, in sunny spot (mornings getting cooler here) in dining room, on fold-up desk.
I'm working on a small text here, hidden so the person concerned doesn't see what it is. It's a small illuminated one. I've just finished layering the gold leaf, so the box on top of the text contains my sheets of 23carat gold leaf on tissue paper
.
(you can just see a peek of vine work at right top end of box)
You'll see a small jar with gold metal lid to top right of text which is the Gilding size, which you paint on before applying gold leaf.
There's also a sharp pointed knife to right front for removing Gilding size + gold leaf from where it's not meant to be, some rubbers, small tiny ones for rubbing out small spots, these are next to Gilding papers.
Paints at rear are there, but I'm actually thinking of mixing some brushos to paint it with for new experiment!! :D Watch ,this space!

My card today was made two weeks ago but not shared, for a twenty first obviously.  Used a stamp (PSX from 1995), stamped it on Vellum with Versamark, gold embossed, and coloured it in promarkers.
Fussy cut around image attached to the Spellbinder Fancy Ovals, largest die cut with 300gsm card, softly tinted background while still in die.
Embossing folder background is Tied Together by Couture Creations, pearls added. Lace dies are from Our Daily Bread border die, coloured fine ribbon with promarkers and thread it through once dry. Greeting is a digi, with SB scallops, 21 is from Cuttlebug Olivia Die set.
 
Well we had a special ceremony yesterday... a pineapple picking one! Here is it a week ago when still not quite ripe!
Here 'tis yesterday, picking time. under supervision!
You know it is ripe when you easily pull a leaf out of centre..
just like you test them in the shops and have a good smell test, too :D this one is not as big as others but smells super sweet the one behind will be bigger it grew during lots of rain.
Plant will sucker a new plant and old plant will die. This is the pineapple from a previous baby - I planted the top from it, next to original plant. Saving this top for BiL.

 Ending with two shots from my walk yesterday afternoon, another sunset, if had stayed another half hour would've been even more scarlet, especially with that lovely mackerel cloud as my dad calls them.

On the post below I've and new stamping technique called Retiform.. with some Darkroom Door Ste Sail stamps .. wow, love this technique will be doing it again!

I'm also totally delighted to welcome a new wonderful encourager ..
Maura of Two stamping Sisters - Maura leaves the loveliest comments when she visits as DT for Simon says Monday blog, so very glad she has joined. Thank you!
....  do pop over to give some encouragement too! 
 Well that's if for me today, thanks so much for popping over and please leave a comment too, love to hear from you.
May God bless your day, wherever you may be, happy WOYWW!
Shaz in oz.x  
Joining up to the following:
1. Word Art Wednesday - anything goes  http://wordartwednesday.blogspot.com.au/
3. Lemon shortbread challenge - anything goes. 
5. ARTstic Challenge - May Flowers

Monday, 15 May 2017

Bizzy Bec's DT Retiform Stamping Technique - Darkroom Door Sail Away

Hi there friends... well, another learning curve for us today, with my DT post for Bizzy Bec's Online craft store. 
 I've found new stamping technique and just had to try it.. it called Retiform Stamping.
If you've no idea what Retiform is, neither did I, though stamping since 1990!
It's great for masculine or feminine cards I've found. My Pinterest page on Retiform Technique is here, with over 50 pins...
 Definition of retiform, by Webster: " composed of crossing lines and interstices : reticular, netlike; ... etc... " 
Left is Darkroom Door Sail Away Stamp set.
This is a grand stamp set isn't it??? See it at Bec's excellent prices HERE!  
Technique can be simple as many are or more complicated as I decided on.
Some basic tips, I thought of:
 *have nice contrasting colour choice, this makes or breaks it. 
* make defined intersecting lines that softly blend out. 
* when stamping images, think about placement and avoid empty space. Have them looking as if they're popping out of intersecting lines, to give more natural look (you'll see what I mean when we come to that). 😉
 
No-one else seemed to bother with this stage.. but felt as mine was tad complicated, I needed to map it out first. Didn't strictly stick to it but was a guide. Used it as template also in inking.
Template for centre, getting ready to ink centre, staring from edges used thee Distress Inks - Faded Jeans, Stormy Sky, Mermaid Lagoon.

Masked off portions and inked them up in alternating shades. Used Antique Linen, Fossilized amber, Frayed Burlap, with bit of gold glitz, for yellow shades..
Learned this from watching videos, often they had a halo around edges, so I overlapped them just a tiny bit so as to avoid halo.
Adding Masks now for image stamping, using smaller and larger stamps from DD Sail Away.
Finished Retiform. The white mark is actually a shine not white area. Shine is from tape which was not re-positionable.. am no longer using it for that. I have added matte medium glue to the residue it left and it is now matte and fine :D
Card - take 1 because wanted to re-do the central image!
Card Take 2 you can see below. Partly I like the first card, but felt too little contrast with central image, hence remake of it. It is what it is, now! :D

Lawn Fawn So Much to say ... birthday greeting.
Distress inks -
Antique Linen, Fossilized amber, Frayed Burlap,
Faded Jeans, Stormy Sky, Mermaid Lagoon, Salty Ocean.
Ranger Archival Ink for navy stamping -Cobalt  + Sepia for splatter.
(if you see something that is not listed in store, then ask Bec via email to see if she can order it in for you! 

You may like to  join in the Bizzy Bec's Anything Goes challenge for May HERE.. someone has to win that prize.

 I really appreciate all who call by to say hi! 
(Also would love it if any of you have time to pop over and comment on my DT post over here at Bizzy Bec's blog!)
 May God richly bless your day wherever you may be! 
Shaz in Oz.x

I will sing of the mercies of the Lord for ever: with my mouth will I make known thy faithfulness to all generations. Psalm 89:1

Linking up to:
1. Word Art Wednesday - anything goes     http://wordartwednesday.blogspot.com.au  
2. Di's Snippety challenge, used snippets - http://pixiescraftyworkshop.blogspot.com.au/
Related Posts Plugin for WordPress, Blogger...